LogoLogo
Release NoteMicrositeWhite PapersCloud License
Cloud User Manual
Cloud User Manual
  • What is EnGenius Cloud?
  • Getting Started
    • Signing Up
    • Logging On
    • Registering Devices to Organization
    • Assigning Devices to Network
    • Device Setup
      • QIG
      • Troubleshooting ECW AP
        • LED Status
        • Default SSIDs
        • Login to Local Access Page
      • Label information
  • Working with Organization Trees
    • Organization
    • Hierarchy View
    • Network
  • Managing Devices
    • Managing Camera
      • Recording Playback and smart Motion Search
      • Configure and Check Camera Details
        • Camera AI settings
        • Region & Cross Lines
      • Video Walls
      • AI-Powered Search
    • Managing Gateway
      • Configure and Check Gateway Details
      • VPN Status
    • Managing Access Points
      • Diag Tools
      • Configure and Check AP Details
      • AirGuard
    • Managing Switches
      • Diag Tools
      • PoE scheduling
      • Getting Switch Analytics
      • PD/Auto-Cam Lifeguard
      • VLANs
      • Mirror
      • Link Aggregation
    • Managing PDU
      • Outlet Summary
      • Outlet Scheduling
      • Outlet AutoReboot
      • Alerts
      • Diag Tool
      • LCD Panel
    • Managing Clients
      • Client Timeline
    • Device Map Location
    • Floor Plans
    • Topology
  • Configuring Networks
    • Configuring Access Points
      • Configuring SSIDs
        • 802.11 Settings
        • Configuring Security
        • SmartCasting
        • Client IP Addressing
        • Dynamic VLAN Pooling
        • Advanced Settings
        • QoS
        • Captive Portal
        • LDAP server
        • Active Directory
        • Azure AD
        • Voucher Service
        • Configuring Splash Page
        • Access control
        • Clone SSID
        • Hotspot 2.0
        • Application Control
        • Layer 3 (L3) outbound firewall
        • Examples
      • Configuring Radio
      • Configuring Cloud RADIUS
      • Configuring MyPSK
      • Configuring VLAN
    • Configuring Switch
      • System & Protocols
      • Templates
    • Configuring Gateway
      • Configuring Interface
        • WAN
        • LAN
        • Static Route
        • Policy Route
      • Configuring Site to Site VPN
      • Configuring Client VPN
        • VPN settings for IOS
        • VPN settings for Mac OS
        • VPN settings for Android
        • VPN settings for Windows 10
      • Configure ESG VPN Users
      • Configuring Firewall
    • Configuring PDU
      • Template
    • Configuring Camera
      • Quality & Retention
    • Firmware Upgrade
    • General Settings
    • Client Access Control
  • Analytics
    • Device Events
    • System Events
    • Config Logs
  • MSP Portal
    • Dashboard
    • Teams
    • Inventory & License
    • Clone Org & Networks
  • Managing Organizations
    • Managing Device Inventory and License
    • Privacy
    • Backup & Restore
      • Configuration Template
  • Managing Team Members
    • Roles and Permissions
  • Notification & Alerts
    • Notification Center
    • Configuring Alert Settings
  • Mobile App
  • Get Remote Support
  • Security
    • Two Factor Authentication
    • RadSec Certificate
  • Report
  • Appendix
    • Access Point LED Behavior
    • ESG LED Behavior
    • SSID Troubleshooting Naming Rules
    • Firewall rules
      • Global Site
      • Japan Site
  • Configuration Guide
    • SAML SSO with ADFS
Powered by GitBook
On this page
  • Win10 connects to VPN IPsec Xauth PSK
  • 1. Download the VPN Access Manager application.
  • https://www.shrew.net/download/vpn/vpn-client-2.2.2-release.exe
  • 2. Install vpn-client-2.2.2-release.exe
  • 3. Setup VPN client setting
  • 4. Use ping traffic to check VPN link status.

Was this helpful?

Export as PDF
  1. Configuring Networks
  2. Configuring Gateway
  3. Configuring Client VPN

VPN settings for Windows 10

Last updated 2 years ago

Was this helpful?

Win10 connects to VPN IPsec Xauth PSK

1. Download the VPN Access Manager application.

2. Install vpn-client-2.2.2-release.exe

3. Setup VPN client setting

a. Click Add button to add a VPN profile

b. Input the VPN server IP address and click the Save button.

c. Client use default setting.

d. Name Resolution uses the default setting.

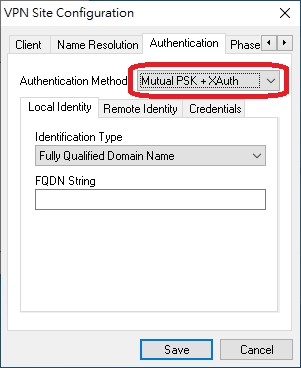
e. Authentication select Mutual PSK+XAuth and click the Save button.

f. Authentication>Credentials input IPsec Pre-share key and click Save button.

g. Phase 1 Exchange Type select to main and click the save button.

h. Click VPN profile, input user name, and password, and click Connect button.

i. Click Network to check VPN connection status.

4. Use ping traffic to check VPN link status.

a. Ping VPN server LAN side PC

b. ping VPN server WAN side DNS.

c. ping www.google.com.

Note: ESG510 Local Identify Type should change to IP address.

https://www.shrew.net/download/vpn/vpn-client-2.2.2-release.exe