
Operations
Chapter 7.5: Executing Remote Operations
Your interface for direct, powerful, BMC-level actions on a node.
⚠️ Configuration Access Required
Required Role: POD Admin or Organization Admin
Available to: Admin roles only
Scope: Individual node level
Risk Level: HIGH — Direct hardware control with immediate effects
Important: No "undo" function available for these operations
Overview: Your Remote Hardware Control Panel
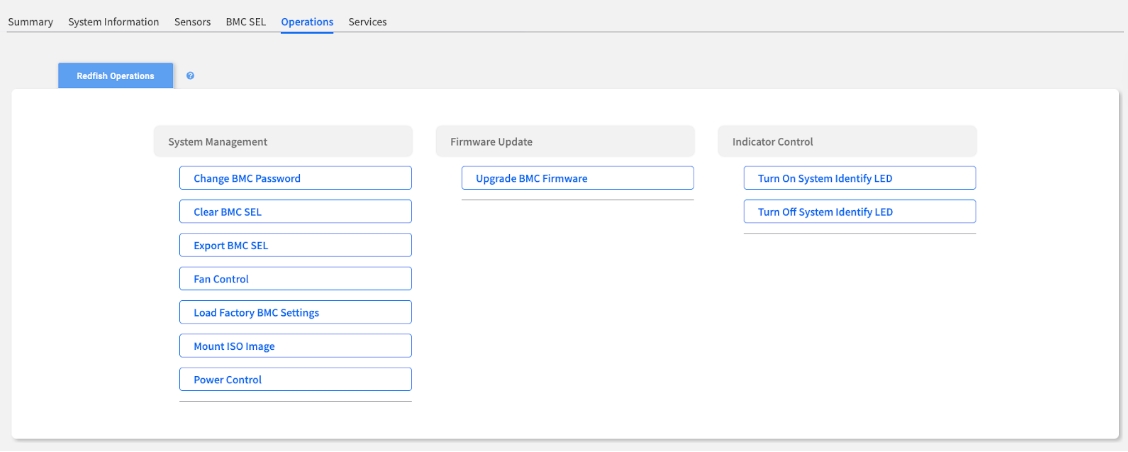
The Operations tab is your toolbox for direct hardware control. Think of it as a remote control panel that interacts directly with the server, allowing you to perform tasks as if you were physically standing in front of it.
The actions on this page are executed as immediate Redfish commands sent directly to the node's Baseboard Management Controller (BMC). This provides powerful, out-of-band control that is completely independent of the operating system. Use this tab for specific administrative tasks, advanced troubleshooting, and maintenance.
Critical Safety Warning
The operations on this page directly affect the node's hardware and can cause immediate service interruption or data loss if used improperly.
Every action requires user confirmation.
There is no "undo" function.
Commands can only be executed when the node is Online and actively communicating with EDCC.
Always verify you have the correct node selected before proceeding.
Operations Quick Reference: Task & Risk Guide
Before performing an action, use this table to quickly find the right tool for your task and understand its associated risk level. This helps in making a quick but informed decision, especially during a critical incident.
Force-reboot a frozen node
Power Control (Reboot - Immediately)
HIGH
YES
Gracefully restart a node
Power Control (Reboot - Orderly)
LOW
☑ NO
Install an operating system
Mount ISO Image
MEDIUM
☑ NO
Apply a BMC firmware patch now
Upgrade BMC Firmware
MEDIUM
☑ NO
Apply a BIOS firmware patch now
Upgrade BIOS Firmware
HIGH
DOWNTIME
Find a specific node in a rack
Turn On System Identify LED
LOW
☑ NO
Reset a misconfigured BMC
Load Factory BMC Settings
HIGH
CONFIG LOSS
Update the BMC admin password
Change BMC Password
LOW
☑ NO
Archive event logs for an audit
Export BMC SEL
LOW
☑ NO
Risk Assessment:
Always choose the lowest-risk option that accomplishes your goal. For example, use "Orderly" shutdown/reboot whenever possible.
Operations Deep Dive
Troubleshooting & Recovery
These operations are for diagnosing and recovering a node from a problematic state.
Power Control
This is your remote power switch, allowing you to control the node's power state as if you were pressing the physical buttons. The key difference lies in the "Orderly" (graceful) versus "Immediately" (forced) actions.
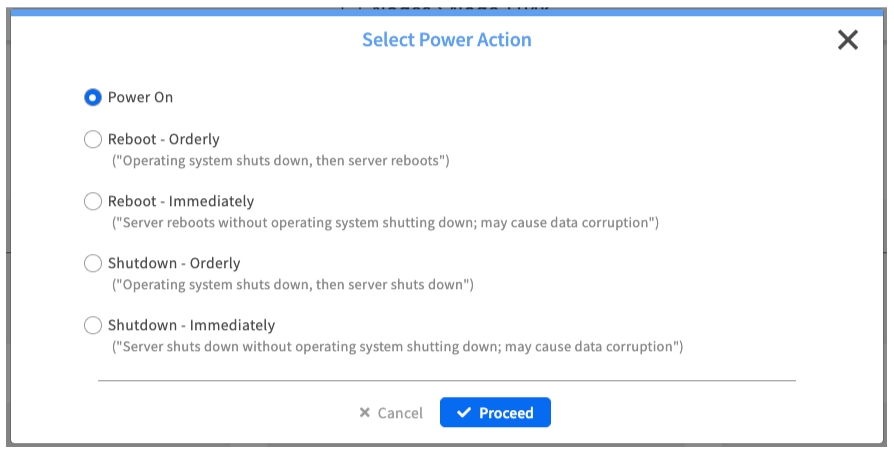
Power On
Turns the node on.
Low Risk: Standard startup procedure.
Reboot - Orderly
Signals the OS via ACPI to shut down gracefully before restarting.
Low Risk: The safest way to reboot a responsive system.
Reboot - Immediately
Forces an immediate hardware power cycle without OS shutdown.
High Risk (Potential Data Corruption): Use only when the OS is completely frozen.
Shutdown - Orderly
Signals the OS via ACPI to shut down gracefully before powering off.
Low Risk: The safest way to power down a node.
Shutdown - Immediately
Forces an immediate hardware power-off without OS shutdown.
High Risk (Potential Data Corruption): Use as a last resort when the OS is unresponsive.
Power Operation Best Practices:
Always Try Orderly First: Give the OS a chance to shut down gracefully.
Wait for Completion: Allow adequate time for orderly operations to complete.
Monitor Progress: Watch for successful completion before assuming failure.
Document Emergency Actions: Log when forced operations were necessary.
Load Factory BMC Settings
Purpose: Resets the BMC's configuration to its original factory defaults. This erases custom network settings and user accounts on the BMC itself.
When to Use: As a last resort for an unresponsive BMC, or to securely wipe management settings before decommissioning a node.
Configuration Loss Warning:
This will reset ALL BMC settings including network configuration, user accounts, and custom settings. You will need to reconfigure the BMC after this operation.
Fan Control
Purpose: Manually overrides the automatic fan speed algorithm.

When to Use: To temporarily maximize cooling during a high-temperature event.
Best Practice: Always return the fan control to Auto Speed after your task is complete.
Temperature Monitoring:
Monitor temperature sensors while using manual fan control to ensure adequate cooling.
Deployment & Maintenance
These actions are for planned maintenance and initial node setup.
Mount ISO Image
Purpose: Attaches a virtual ISO image from the EDCC repository to the node, making it a bootable device.
When to Use: For installing an operating system or running bootable diagnostic tools.
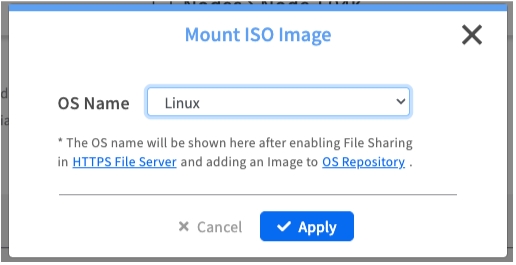
Prerequisite Required
Before using this feature, you must configure the HTTPS File Server in System > Application Settings and upload your ISO files.
Setup Requirements:
Configure File Server: Set up HTTPS File Server in Application Settings.
Upload ISO Files: Place ISO images in the configured repository.
Verify Access: Ensure BMC can reach the file server.
Test Connection: Verify ISO mounting works in test environment.
Firmware Management (BMC & BIOS)
These operations perform manual, on-demand firmware updates for this single node.
Manual vs. Automated Updates
This operation is for updating one node, right now. For automated, scheduled updates for the entire POD, use the Configure > Firmware Provisioning module instead.
Upgrade BMC Firmware
Purpose: Applies an urgent security patch or tests a new BMC firmware version.
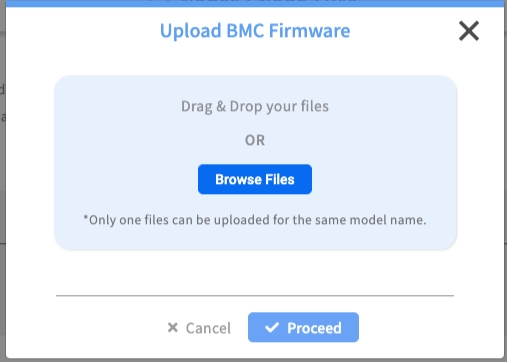
What to Expect:
The update process can take up to 30 minutes.
During the update, the BMC itself will reboot, causing a temporary loss of management connection between EDCC and the node.
The node's main OS (if running) will remain online during a BMC-only update.
Management access will be restored automatically once the BMC reboot and update are complete.
Upgrade BIOS Firmware
Purpose: Applies a new system BIOS/UEFI version.
What to Expect:
The update process (staging and flashing) can take up to 30 minutes.
A BIOS update requires a full server reboot to take effect. This will cause service interruption and OS-level downtime.
The BMC will remain online, but you will need to schedule a maintenance window to perform the required server reboot after the update is applied.
Firmware Update Best Practices:
Verify Compatibility: Ensure firmware version is compatible with hardware.
Plan Downtime: Schedule updates (especially BIOS) during maintenance windows.
Test First: Test new firmware on non-critical systems first.
Monitor Progress: Watch for successful completion and BMC/server recovery.
Security & Auditing
These operations are for managing access and maintaining records.
Change BMC Password
Purpose: Securely updates the password for the BMC's administrative user.
When to Use: As part of a regular security policy or during initial setup.

Security Best Practices
Strong Passwords: Use complex passwords meeting security requirements.
Regular Rotation: Change passwords according to security policy.
Document Changes: Update password management systems.
Test Access: Verify new password works before closing session.
Clear / Export BMC SEL
Purpose: Manage the System Event Log for maintenance and auditing.
Clear BMC SEL
Erases all entries from the System Event Log.
After maintenance to ensure a clean log.
Export BMC SEL
Downloads the complete event log for offline analysis.
For compliance audits or detailed analysis.
Event Log Management:
Export Before Clear: Always export logs before clearing for audit trail.
Regular Archives: Schedule regular log exports for compliance.
Coordinate with Maintenance: Clear logs after completing maintenance work.
Backup Exports: Store exported logs in secure, accessible location.
Physical Datacenter Operations
This action helps you bridge the gap between the digital management interface and the physical hardware.
Turn On / Off System Identify LED
Purpose: Controls the physical locator LED on the node's chassis, causing it to blink.
When to Use: To help a technician physically locate the correct machine in a crowded data center rack.
Physical Coordination Best Practices
Coordinate with Technicians: Turn on LED before technician arrival.
Verify Location: Have technician confirm correct node before work.
Turn Off After: Disable LED once physical work is complete.
Multiple Nodes: Use carefully in multi-node maintenance to avoid confusion.
Operation Safety Protocols
Pre-Operation Checklist
Before Any Operation:
Verify Node Identity: Confirm you have the correct node selected.
Check Current Status: Review node health and active services.
Assess Risk: Choose the lowest-risk operation for your goal.
Plan Recovery: Understand how to recover if operation fails.
Coordinate Impact: Notify affected users if service interruption expected.
High-Risk Operation Protocol
For Operations with Data Loss or Downtime Risk:
Get Authorization: Confirm approval for potentially disruptive operations.
Backup Critical Data: Ensure important data is backed up if possible.
Schedule Appropriately: Use maintenance windows for high-risk operations.
Monitor Closely: Watch operation progress and system response.
Document Results: Record operation outcomes and any issues.
Emergency Operations
When System is Unresponsive:
Try Lowest Risk First: Attempt orderly operations before forced ones.
Escalate Gradually: Move to higher-risk operations only if necessary.
Document Emergency: Record why forced operations were required.
Follow Up: Check for data integrity issues after emergency operations.
Chapter Summary & Key Takeaways
Check Online Status: Operations require the node to be Online and communicating with EDCC.
High-Risk Actions: Be especially cautious with "Immediately" power actions, "Load Factory BMC Settings," and "Upgrade BIOS Firmware" as they can cause data loss, reconfiguration, or downtime.
Know Your Tools: Use this page for manual, single-node tasks. Use the Configure module for automated, POD-wide policies.
Firmware Updates Cause Disconnects: Be prepared for the BMC to temporarily disconnect during firmware updates (up to 30 mins).
Prerequisites Matter: Mount ISO requires a pre-configured file server. Ensure it's set up before you need it.
The LED is Your Friend: The Identify LED is a simple but invaluable tool for preventing mistakes during physical maintenance.
Admin Rights Required: All operations require Admin permissions.
What's Next:
Chapter 7.6 will explore the Services tab, where you'll learn to monitor and manage service health status across your infrastructure.
💡 Emergency Preparedness: Familiarize yourself with these operations during calm periods, not during emergencies. Practice with non-critical systems to build confidence and competence.