
Team Members
Chapter 15: Managing Users and Permissions
Control access to your EDCC platform by inviting team members and assigning granular permissions.
🔒 Organization Administrator Only
Required Role: Organization Admin only
Access Level: Full user management capabilities
Restriction: POD Admin and Viewers cannot access this section
Scope: Organization-wide user administration
Overview: Your Access Control Center
The Team Members page is the central command center for all user account management within your Organization. From here, an Organization-level Admin can invite new users, assign roles, and modify permissions to ensure every team member has the precise level of access they need, adhering to the principle of least privilege.
The entire system operates through an email-based invitation process.
Prerequisite: SMTP Server Must Be Configured
Before you can invite new members, an administrator must first configure an SMTP server in System > Application Settings. Without a working mail server, EDCC has no way to send invitation emails, and this feature will not function.
Understanding EDCC's Two Permission Models
EDCC employs a powerful, two-tiered permission model. A user can have EITHER an Organization-level role OR specific POD-level roles, but NEVER both at the same time. Understanding this distinction is the key to effective access control.
Permission model : Organization-level vs POD-level access
Organization-level
Grants Admin or Viewer rights across all current and future PODs within the Organization.
Inheritance is automatic and absolute. You cannot make exceptions for individual PODs. Use Case: For global administrators or auditors who need universal access.
POD-level
Grants Admin or Viewer rights to specific, individual PODs that you select.
Only available if the user has NO Organization-level role. Use Case: For delegated administration, like granting a site manager control over their specific data center POD only.
Role Definitions
Admin Role
Grants full access to both MANAGE and CONFIGURE modules for the assigned scope.
Full control within authorized areas.
Viewer Role
Grants read-only access to the MANAGE module for the assigned scope.
Monitor-only, no configuration changes.
The User Management Interface
The main page provides a comprehensive list of all users associated with your Organization, allowing you to quickly audit who has access to what.
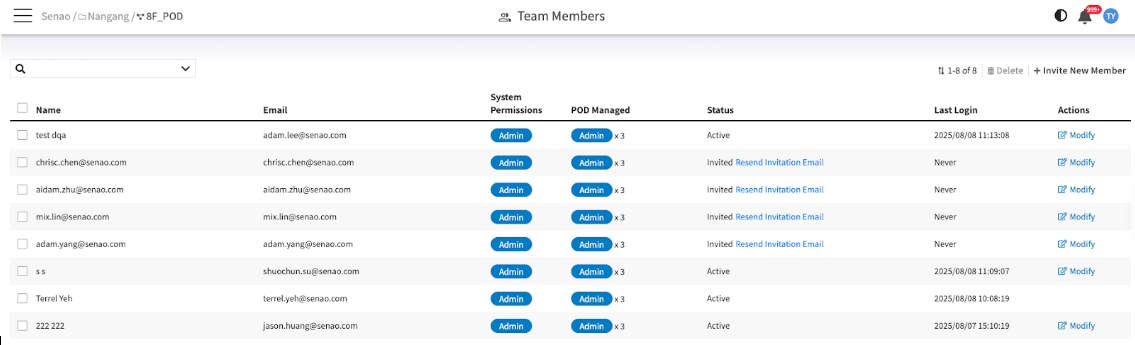
The User List Explained
Name / Email
The user's identity and login ID.
System Permissions
Displays the user's highest-level role.
If a user has an Organization-level role (Admin or Viewer), it will be shown here. If this is blank, they only have POD-level permissions.
POD Managed
At-a-glance scope summary.
This shows a count of the PODs the user has access to, broken down by permission type (e.g., "Admin x2, Viewer x1"). This is the fastest way to understand a user's scope of control.
Status
The user's account state.
Active means they can log in. Invited means an invitation has been sent but not yet accepted.
Last Login
The timestamp of the user's last login, crucial for auditing account activity and identifying dormant accounts.
Actions
Contains the Modify and Delete buttons for managing the user account.
The Invitation & Permissions Workflow
Inviting a new member and assigning their permissions is the most common workflow on this page. The process is the same, but the way you assign permissions determines which permission model they fall under.
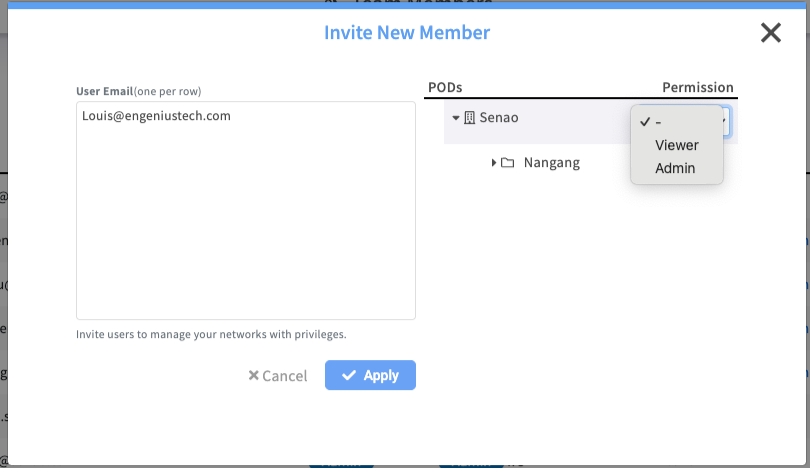
Task 1: Invite a Global Administrator (Org-Level Role)
Use this for: System administrators, senior IT staff, or auditors who require universal access to all infrastructure managed by this Organization. Assigning an Organization-level role is a powerful action, as it grants broad permissions that cannot be restricted on a per-POD basis.
Process:
Click the + Invite New Member button.
Enter the user's email address.
In the PODs section, find the dropdown menu next to the top-level Organization name.
Select Admin or Viewer. This single action grants them that role across all PODs.
Click Apply.
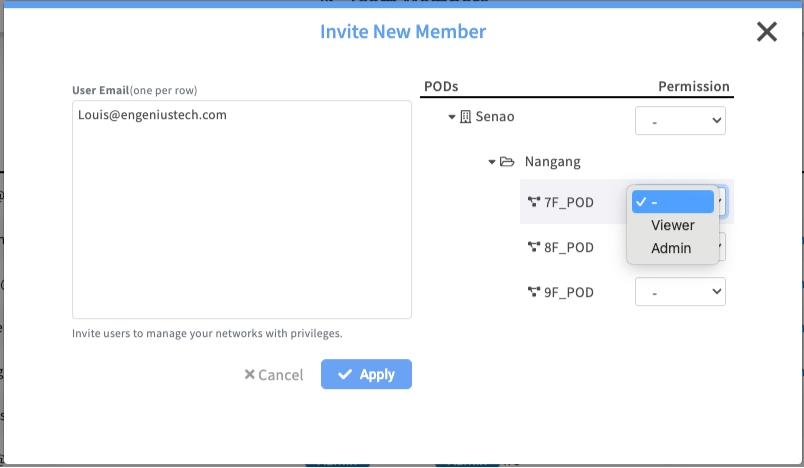
Task 2: Invite a Delegated Administrator (POD-Level Roles)
Use this for: Site managers, department IT, or team members who should only have access to specific environments. This is the standard method for enforcing the principle of least privilege, ensuring users can only manage the resources directly relevant to their responsibilities.
Process:
Click the + Invite New Member button.
Enter the user's email address.
Crucially, ensure the Organization-level dropdown is set to its default ("-").
Now, go down the list and select Admin or Viewer for at least one specific POD you want to grant them access to.
Click Apply.
Important: A User Must Have at Least One Role
As noted in your feedback, the Apply button will be disabled if a user has no permissions assigned. You must grant them either an Organization-level role (Task 1) or at least one POD-level role (Task 2) before you can save or send the invitation.
Task 3: Modify an Existing Member's Permissions
As roles and responsibilities change within your organization, you will need to adjust user permissions accordingly.
Process:
Find the user in the list and click the Modify button in the Actions column.
The Privilege Setting dialog will appear.
Adjust the permissions as needed.
Click Apply to save the changes.
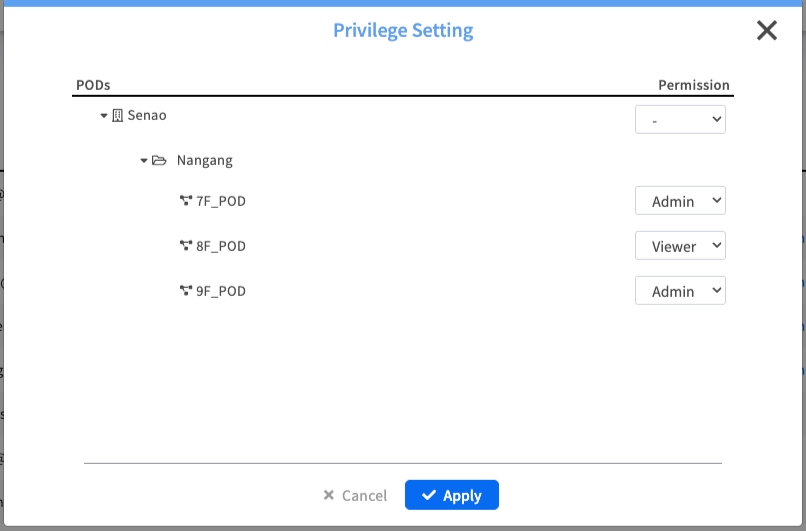
Correcting the "Common Mistake": Switching from Org-Level to POD-Level
The most common point of confusion is switching a "Global Admin" (Org-level) to a "Delegated Admin" (POD-level). You must do this in a single, combined action.
Correct Process:
Click Modify on the user (e.g., "Global-Admin-User").
In the dialog, set their Organization-level permission dropdown from "Admin" back to "-".
DO NOT CLICK APPLY YET. The "Apply" button will be disabled, as the user now has no roles.
In the same dialog, scroll down and assign their new, specific POD-level roles (e.g., "POD-A: Admin", "POD-B: Viewer").
Now that the user has valid permissions, the Apply button will be enabled. Click it to save the change.
Chapter Summary & Key Takeaways
SMTP is Mandatory: You cannot send invitations without a configured mail server.
Two Models, Mutually Exclusive: A user has EITHER an Org-level role OR POD-level roles, never both.
Org-Level is Absolute: An Org-level role grants access to all PODs, with no exceptions.
POD-Level is for Delegation: Use POD-level roles to grant specific, limited access.
Must Have One Role: You cannot save a user with no permissions. They must have at least one Org or POD role.
Logout/Login for Changes: Existing users may need to log out and log back in for permission changes to take full effect.
Organization Admin Only: This entire functionality is restricted to Organization Administrators.
Principle of Least Privilege: Start with minimal access and expand as needed.
What's Next: Chapter 16 will explore Configuring the System (System Settings), where you'll learn to manage EDCC platform-wide settings and infrastructure.
💡 Pro Tip: Use POD-level permissions as your default approach—they provide better security and easier access management. Reserve Organization-level permissions for users who truly need universal access.