
Node List
Chapter 6: Managing Nodes with the Node List
Your command center for viewing, organizing, and performing powerful batch operations on all nodes within your POD.
ℹ️ Node Management Access
Available to: All user roles
Scope: Organization, Hierarchy View, POD levels
Permissions:
Admin roles: Full management capabilities within authorized PODs
Viewer roles: Monitor-only access
Overview
The Node List is the heart of your daily management tasks. Think of it as a powerful spreadsheet built for infrastructure management. Its entire purpose is to help you efficiently perform three core tasks:
Find: Quickly locate specific nodes using search and filters.
Organize: Group nodes into logical collections that mirror your operational needs.
Act: Execute powerful individual or bulk (batch) operations.
This chapter will guide you through mastering this workflow.
💡 Scope Impact: The Node List content changes based on your selected scope:
Organization/HV: Shows nodes from all authorized PODs within that scope
POD: Shows only nodes from the selected POD
Permission Filtering: You only see nodes from PODs you have access to
Scope Impact
The Node List content changes based on your selected scope:
Organization/HV: Shows nodes from all authorized PODs within that scope
POD: Shows only nodes from the selected POD
Permission Filtering: You only see nodes from PODs you have access to
Finding the Nodes You Need
In any large environment, your first challenge is to pinpoint the right nodes.
Search & Filter Options
Search Bar
Quick lookup by known identifiers
Search "EAS1210" or "192.168.1.100"
Column Sorting
Trend identification
Sort by "Uptime" to find recently rebooted nodes
Search Strategies
Quick Identification:
Search Bar: Use the search bar at the top to instantly find a node by its Name, Serial Number, or IP Address
Column Sorting: Click on any column header (e.g., Uptime, Last Update) to sort the entire list. This is a quick way to find nodes that have recently rebooted or haven't checked in
Pro Tip: Combine sorting with filtering for powerful queries like "Show all EAS2210 models sorted by oldest firmware version"
Organizing Your Nodes with Groups
Once you can find your nodes, the next step is to organize them for efficient management.
What are Groups? A "Tagging" System
Critical Concept: Groups in EDCC are labels (or tags), not folders.
Key Characteristics:
Flexible Membership: A single node can belong to many groups at the same time. For example, a node could be tagged as "Database Servers," "Linux," and "Floor-8-Rack-A" simultaneously
For Organization Only: Placing a node in a group does not change its configuration. It is purely an organizational tool to make selecting and viewing nodes easier
Cross-POD Groups: Groups can contain nodes from multiple PODs (when viewing at Organization or HV level)
Why Groups are Your Most Powerful Tool
The time you invest in creating logical groups will pay off massively when you perform bulk operations.
Recommended Grouping Strategies:
By Role
Web Servers, Database Servers, Compute Nodes
Application-specific maintenance
By Environment
Production, Staging, Development
Environment-based operations
By Physical Location
Data-Center-A-Rack-10, Branch-Office-B
Physical maintenance planning
By Maintenance Policy
Update-Group-A (first Sunday), Update-Group-B (second Sunday)
Scheduled maintenance
By Criticality
Mission-Critical, Standard, Development
Priority-based management
Best Practice: The Payoff
A clear grouping strategy is the foundation of efficient bulk management. Once your groups are set, a task like "Power down all development servers" becomes as simple as:
Click the "Development" group tab
Select all nodes
Execute the bulk "Power Off" operation
How to Create and Manage Groups
You can create and manage groups using two main workflows, depending on your preference.
Method A: Create an Empty Group, Then Add Nodes
Ensure you are on the All Nodes tab.
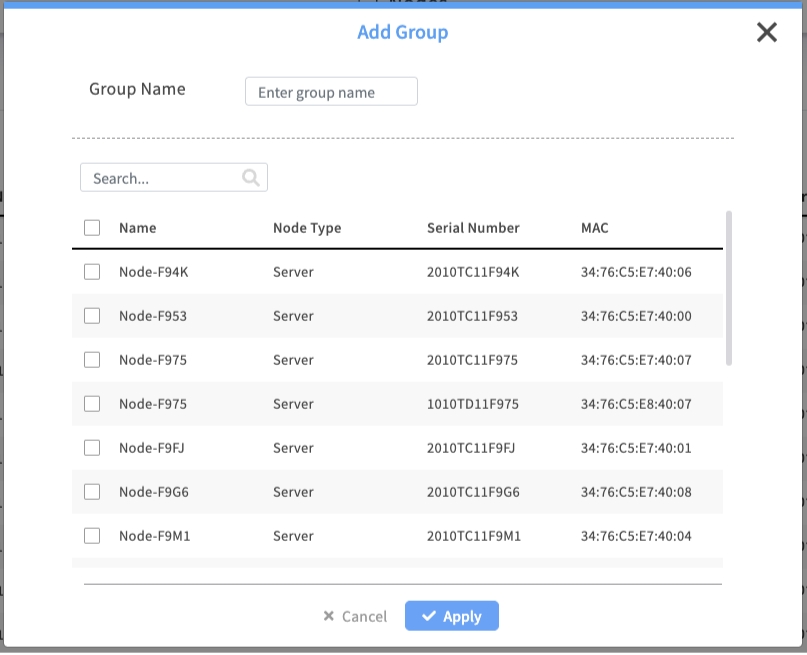
Click the + Add Group button on the toolbar.
Enter a name for your group (e.g., "Production-DB-Servers") and click Apply.
Click your newly created group tab.
Click the Add from ALL nodes button on the toolbar, then check the boxes for the nodes you wish to add to this group.
Method B: Select Nodes First, Then Create a Group (Recommended)
On the All Nodes tab, check the boxes next to the nodes you want to group together.
Click the + Add Group button on the toolbar.
Enter a name for your group.
Click Apply. EDCC automatically creates the new group and adds your selected nodes to it.
How to Remove a Node from a Group
Click on the custom group's tab.
Check the boxes next to the nodes you want to remove.
Click the Remove from Group button on the toolbar.
Important Concept: "Remove from Group" does not delete the node from the POD. It only removes the "tag." The node remains fully managed and is still visible in the All Nodes list.
Taking Action on Your Nodes
After you've found and selected your target nodes, you can perform a wide range of management actions.
Quick Actions on a Single Node
For any node in the list, click the ... (More actions) menu on the far right to access direct management shortcuts. These are your go-to tools for deep-dive troubleshooting on an individual node.
Details
Your primary entry point for in-depth analysis. Takes you to the full Node Detail page
All users
BMC Web
Opens the node's native Baseboard Management Controller (BMC) web interface in a new browser tab
All users
BMC KVM
Launches a KVM (Keyboard, Video, Mouse) remote console session, giving you direct, OS-level graphical control
All users
BMC Console
Launches a Serial-over-LAN (SoL) console session, providing a lightweight, text-based command-line interface
All users

Powerful Bulk (Batch) Operations
This is where you can save the most time. To begin, select the checkboxes next to one or more nodes. This will activate the bulk operations toolbar.
Crucially, the available buttons on the toolbar change depending on which group tab you have selected.

Bulk Operations in the "All Nodes" Tab
This view is your main hub for asset management and initial organization.
Operations: Execute remote actions (e.g., Power Control, Clear SEL) on all selected nodes.
💡 Pro Tip: As your team noted, this provides a subset of commands suitable for batch execution. For the full set of single-node operations (like change BMC password and mounting an ISO), see Chapter 7.5: Executing Remote Operations.
Service Subscription (or Services): Batch-assign or update the monitoring "Service Profiles" for multiple nodes at once.
Move to (or Move to POD): Moves the selected nodes from this POD to another POD. (Note: This typically requires Organization Admin permissions.)
Remove from POD: Returns the selected nodes to the unassigned System > Inventory list. This un-manages the node.
Add Group: Creates a new group tab. If you have nodes selected before clicking, they will be automatically added to this new group.
Add from Inventory (or Add Node): Begins the workflow to add unassigned nodes from the
System > Inventoryinto this POD.
Bulk Operations in a "Custom Group" Tab
This view is your primary workspace for daily operations and maintenance on a specific set of nodes.
Operations: Same as above, but acts only on the selected nodes within this group.
Service Subscription (or Services): Same as above, for nodes in this group.
Remove from Group: Removes the selected nodes from this group tag. The nodes remain in the "All Nodes" list.
Add from ALL nodes: A convenient shortcut to add more nodes from the "All Nodes" list into this current group.
Important: Measure Twice, Cut Once
Bulk operations are powerful and execute immediately. There is no "undo" function. Always double-check which nodes are selected before you click "Apply".
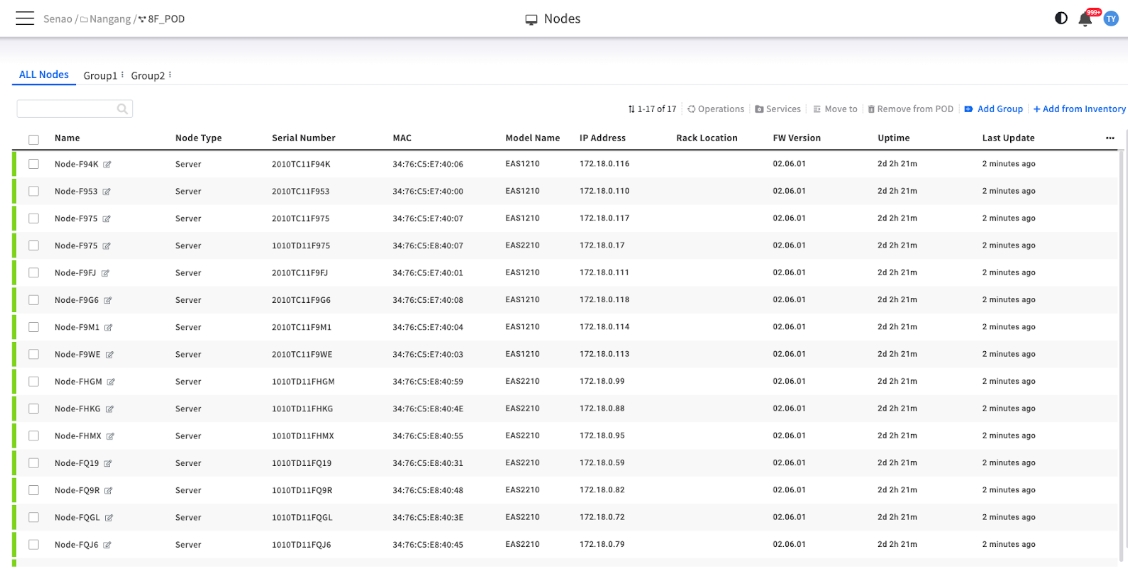
Reference: The Node Table Columns
The main table provides key information at a glance. While all columns are useful, pay special attention to these during daily checks:
Name
The unique identifier for the node
Identity
Node Type
Physical or Virtual device classification
Planning
Serial Number
Hardware serial for warranty and support
Support
MAC Address
Network identifier for BMC interface
Network
Model Name
The specific EnGenius model (e.g., EAS1210). Useful for filtering
Inventory
IP Address
The IP address of the node's BMC, which EDCC uses for management
Critical
Rack Location
The physical location defined in POD View. Essential for finding a node
Physical
FW Version
The current BMC firmware version. Look for inconsistencies across nodes
⚠️ Security
Uptime
How long the node has been running. Look for unusually low uptime (recent reboot)
Health
Last Update
The last time EDCC received a status update. Look for old timestamps (offline nodes)
Critical
Key Columns for Daily Monitoring
Health Indicators (check these first):
Last Update: Old timestamps indicate communication issues
Uptime: Low values suggest recent reboots or instability
IP Address: Empty or incorrect IPs prevent management
Consistency Checks (review periodically):
FW Version: Ensure consistent firmware across similar nodes
Model Name: Verify hardware inventory accuracy
Chapter Summary & Key Takeaways
Master the Workflow: First Find your nodes (with search/filters), then Organize them (with groups), then Act on them (with single or bulk operations)
Groups are Tags: Use groups as flexible labels to make selection and bulk operations fast and safe.
How-To is Key: Create groups by selecting nodes in "All Nodes" and clicking "Add Group," or by adding nodes to a custom group using "Add from ALL nodes."
Context is Everything: The bulk operations toolbar changes depending on whether you are in the "All Nodes" tab or a custom group tab.
Monitor Key Columns: Uptime & Last Update are your best friends for spotting recently rebooted or unresponsive nodes.
Safety First: Always double-check your selection before performing a powerful bulk operation.
Scope Awareness: Remember that what you see depends on your selected scope and permissions.
What's Next: Chapter 7 will dive deep into individual node management using the Node Detail page, where you'll learn comprehensive monitoring and control of individual servers.
💡 Pro Tip: Create a daily routine of checking the Node List sorted by "Last Update" to quickly identify any nodes that haven't checked in recently.