
OS Deployment
Chapter 10: OS Deployment
Build and manage a centralized library of ISO images for remote operating system installation.
⚠️ Configuration Access Required
Required Role: POD Admin or Organization Admin
Required Scope: POD level only
Restriction: Module disabled when Organization or Hierarchy View selected
Prerequisite: HTTPS File Server must be configured in System Settings
Overview: Your Centralized & Standardized Software Library
The CONFIGURE → OS Deployment page is your OS Repository—a central storage library for all the ISO image files you need for node deployment and maintenance. The goal of this feature is to move away from ad-hoc, manual OS installations towards a standardized, repeatable, and secure process.
By uploading an approved, official OS image here, you create a "single source of truth." This ensures that every time a new node is deployed, it uses the exact same, correct version of the operating system, which is critical for maintaining a stable and secure infrastructure.
This page is for managing the library of available ISOs. The actual process of mounting an ISO to a specific node is performed from the MANAGE → Node Detail → Operations tab.
The Complete OS Installation Workflow
Understanding the full process helps clarify this page's role as a preparation step. Deploying an OS is a multi-step process involving different user roles and parts of the EDCC interface. This page covers Step 2 of that workflow.
Setup → Preparation → Deployment → Execution → Installation(One-Time Setup) An Org-Admin configures the HTTPS File Server in System > Application Settings
(Preparation) You navigate here (CONFIGURE > OS Deployment) to upload the required .iso image to the repository
(Deployment) You navigate to the target node's MANAGE > Node Detail > Operations tab
(Execution) You use the Mount ISO Image operation to attach the ISO from the repository to the node
(Installation) You use the node's remote console (KVM) to boot from the virtual media and perform the OS installation
Prerequisite: Org-Admin Action Required
Before you can upload and use ISO images, an administrator with Organization-level permissions must first enable and configure the HTTPS File Server. This is a one-time setup performed in System > Application Settings. If you cannot upload files, please contact your Org-Admin.
Understanding the OS Repository Interface
The interface is straightforward, consisting of a list of your current ISOs and a primary action button to add new ones.
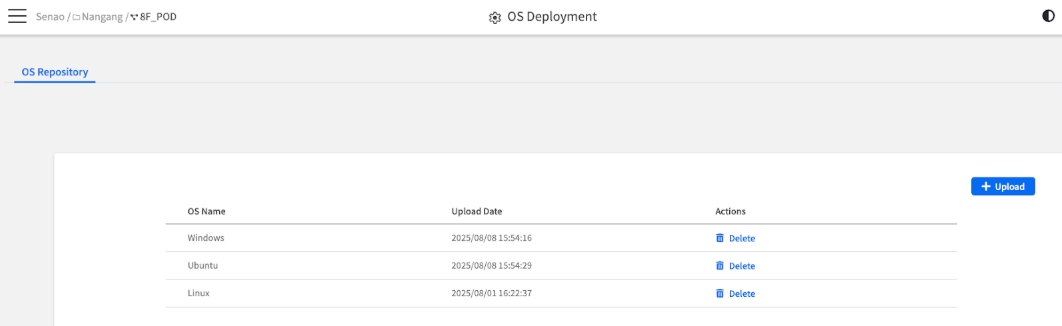
The ISO List
The main table displays all ISOs currently available in the repository
The + Upload Button
Your entry point for adding new ISO images to the library
Managing Your ISO Repository
Viewing the Repository List
The main table gives you an at-a-glance view of your software library's contents.
OS Name
The Unique Key: This is the identifier you assign to the ISO file. It's the name you will select when mounting the image on a node.
Upload Date
Version Control: This timestamp helps you track when an image was last updated, which is useful for knowing if you have the latest version.
Actions
Management Operations: Provides the Delete button to remove the ISO from the repository.
Uploading a New ISO Image
This is the core process for adding new operating systems to your central library. The key concept to understand here is the "OS Name," which acts as a unique slot for each type of OS.
Process:
Click the + Upload button
In the Upload dialog, first select the appropriate OS Name from the dropdown list
Next, either drag and drop your .iso file into the upload area or use the "Browse Files" button to select it
Click OK to begin the upload
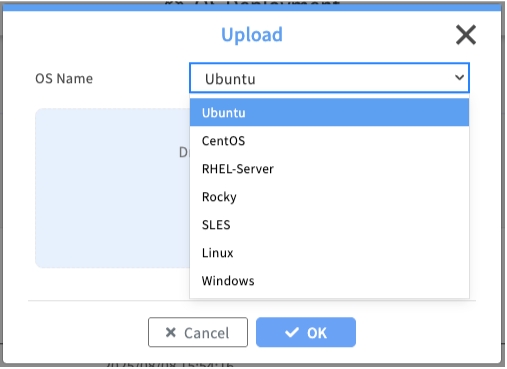
Important: Uploading Will Overwrite Existing Files
The repository allows only one ISO file per OS Name. If you upload a new file for an OS Name that already exists (e.g., uploading a new "Ubuntu" ISO), the new file will overwrite and permanently replace the old one.
Deleting an ISO Image
Deleting an ISO is a simple housekeeping task to remove outdated or unused images from your library.
Process: To remove an ISO file, simply click the Delete button next to it in the list.
Is it safe to delete an ISO?
Yes. Deleting an ISO from the repository is a safe operation. It will not affect any nodes that have already had an operating system installed using that image. It only removes the image from being available for future deployments.
OS Deployment Best Practices
Repository Management Strategies
ISO Organization:
Naming Conventions: Use descriptive OS Names that include version and purpose (e.g., "Ubuntu-22.04-Server", "Windows-Server-2022-Standard")
Version Control: Document which ISO versions are certified for your environment
Storage Planning: Monitor repository storage usage and plan for multiple OS versions
Image Preparation:
Source Verification: Only upload official, verified ISO images from trusted sources
Security Scanning: Scan ISO files for malware before uploading to repository
Customization: Consider pre-configured images with your organization's standard settings
Deployment Planning
Pre-Deployment Checklist:
Network Connectivity
BMC can reach HTTPS File Server
Test with ping or connectivity check
Storage Space
Sufficient space for OS installation
Check target node storage capacity
Backup Strategy
Critical data backed up if needed
Document recovery procedures
BIOS Settings
Boot order and virtualization settings
May need adjustment via BMC
Deployment Scenarios:
New Node Setup
Fresh OS installation
No data loss concerns, straightforward process
OS Refresh
Complete reinstallation
Backup user data, document configurations
Recovery Operations
Restore from known-good image
May need specific recovery ISOs
Testing/Development
Flexible deployment
Can use beta or specialized images
Troubleshooting Common Issues
Upload Problems:
Large File Timeouts: Break deployment into smaller chunks if network is slow
Storage Quotas: Check HTTPS File Server storage limits and cleanup old images
Permission Errors: Verify user has upload permissions and HTTPS server is properly configured
Mount Failures:
Authentication Issues: Verify BMC can authenticate to HTTPS File Server
Network Problems: Check firewall rules and network connectivity between BMC and file server
File Corruption: Re-upload ISO if mounting consistently fails
Installation Issues:
Boot Problems: Verify ISO is bootable and not corrupted
Hardware Compatibility: Ensure OS supports the node's hardware configuration
Storage Detection: Check if OS installer can detect node's storage devices
Chapter Summary & Key Takeaways
It's a Library, Not the Installer: This page is for managing your list of available ISOs. The actual installation is launched from the node's Operations tab
Org-Admin Prerequisite: The entire feature depends on the HTTPS File Server being configured in System > Application Settings
One ISO Per OS Name: Remember that uploading a new ISO for an existing OS Name will overwrite the old one
Deleting is Safe: Removing an ISO from the repository does not affect nodes that were previously installed with it
POD Scope Required: This configuration feature is only available when a POD is selected
What's Next: Chapter 11 will explore Automating Firmware Provisioning, where you'll learn to schedule and manage firmware updates across your POD infrastructure.
💡 Pro Tip: Use descriptive OS Names that include version information (e.g., "Ubuntu-22.04-LTS" instead of just "Ubuntu") to maintain clear version control in your repository.