
Quick Start: Your First POD
This chapter provides a step-by-step tutorial to guide you through creating your first management environment and bringing a node under active management.
ℹ️ Quick Start Guide
Available to: POD Admin, Organization Admin
Scope: POD level operations
Note: Requires at least POD-level Admin permissions for hands-on practice
Prerequisites: At least one EnGenius node ready for registration
Prerequisites
Before starting this guide, ensure:
EDCC platform is installed and accessible
You have Organization Admin or POD Admin credentials
At least one EnGenius node is:
Physically installed and powered on
Network connected (BMC port)
IP address is known or in a scannable range
You know the BMC credentials for your nodes
Your Goal: From Zero to a Managed Node
By the end of this guide, you will have a basic management structure (an Organization and a POD) and your first node will be ready for full monitoring and configuration.
The Workflow at a Glance
We will follow a four-step process:
Register Nodes → Build Management Structure → Assign Nodes → Verify SetupBuild Your Management Structure
First, we need to create the containers for your nodes.
Before You Begin: Registering Your Nodes
For this guide to work, EDCC needs to have at least one registered node in the Inventory.
How Node Registration Works:
Nodes must be manually registered through the System → Inventory page
You'll need to perform an IP scan or manual registration before nodes appear in EDCC
Once registered, nodes will appear in the Inventory in an unmanaged state
Your Action:
Navigate to
System → InventoryClick + Register Device
Use the IP Scan method:
Enter a Start IP and End IP range
Click Scan to discover EnGenius nodes
Select the nodes you want to register
Click Register
What if no nodes are discovered?
If your IP scan returns no results, check:
Network connectivity between the EDCC host and the node's BMC port
Verify the IP range includes your node's BMC IP address
Ensure the node is powered on and BMC is initialized For advanced registration methods, see Chapter 16.1.
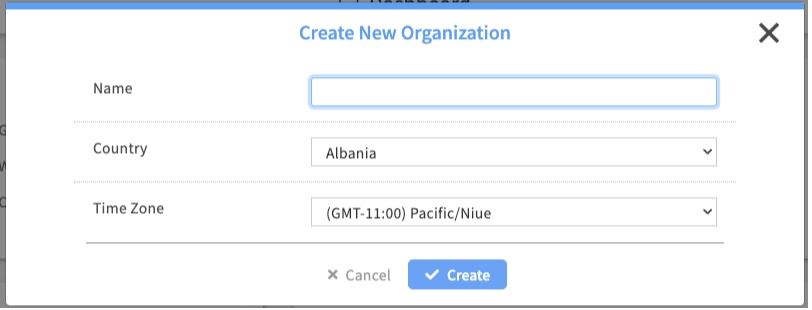
Step 1: Create Your First Organization
The Organization is the top-level container for all your infrastructure.
Process:
Click the hamburger menu (☰) in the top-left corner to open the Management Tree
At the top level of the tree, click the Add Organization icon (+)
In the dialog box, enter a Name, and select your Country / Time Zone
Click Create
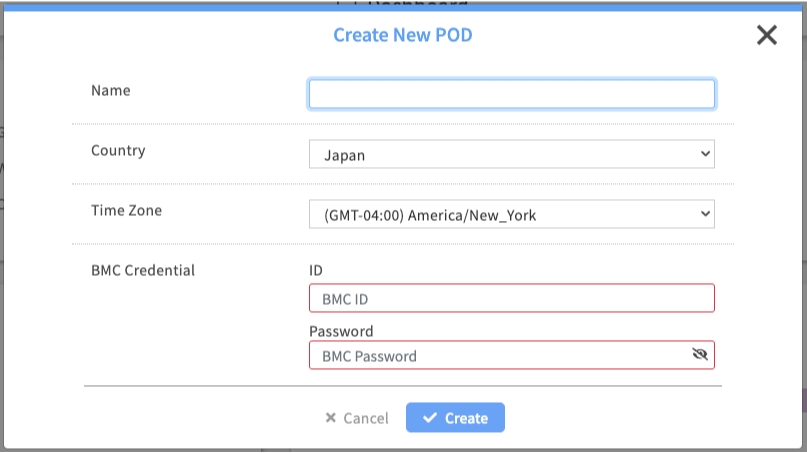
Step 2: Create Your First POD
A POD (Point of Deployment) is the essential management unit where your nodes will live and become configurable.
Process:
In the Management Tree, find the Organization you just created
Click the Add POD icon (+) next to your Organization's name
Fill in the POD details:
Name: Give your POD a descriptive name (e.g., "Main Datacenter" or "Lab-Rack-1")
Country / Time Zone: Set the specific time zone for this POD. This is critical for scheduling maintenance windows
BMC Credential: Enter the default administrative ID and password for the BMCs of the nodes that will be in this POD. EDCC will use this to automatically connect to and manage your nodes
Click Apply
Common Mistake: Incorrect Time Zone
All scheduled tasks, like firmware updates, are based on the POD's time zone setting. An incorrect setting can cause maintenance to run during peak business hours.
Assign Your First Node
Now that you have a POD, you can move a node from the unmanaged Inventory into an actively managed state.
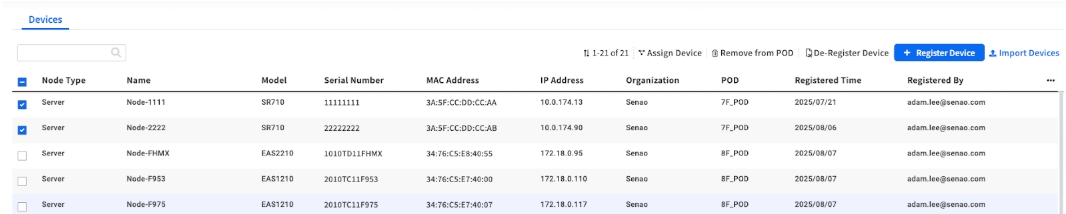
Step 3: Select a Node from Inventory
Process:
Click the System icon (gear) in the bottom-left navigation bar
Select Inventory. You will see a list of all discovered nodes that are not yet assigned to a POD
Select the checkbox next to the node you want to manage
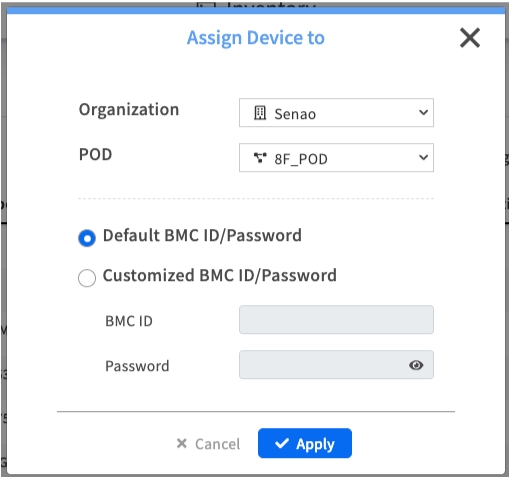
Step 4: Assign the Node to Your POD
Process:
With the node selected, click the Assign Device button in the toolbar
In the dialog box, select the Organization and the POD you created in the previous steps
For BMC Credential, you have two options:
Default BMC ID/Password: Uses the credentials set when creating the POD (recommended for standard deployments)
Customized BMC ID/Password: Use when this specific server has different BMC credentials than the POD default
Click Apply
When to Use Customized Credentials
Legacy servers with unchanged default passwords
High-security nodes with unique credentials
Test environments with different access requirements
Nodes migrated from other management systems
Verify and Next Steps
Finally, let's confirm that your node is now actively managed.
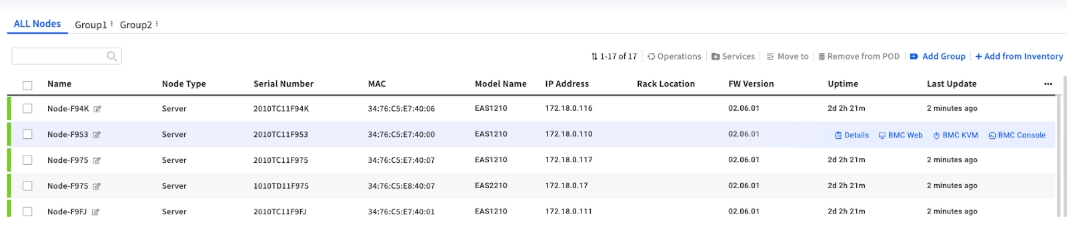
Step 5: Verify Your Managed Node
Process:
Click the MANAGE icon (monitor) in the top navigation bar
Select Node List
Ensure your new POD is selected in the Management Tree
You should now see your assigned node listed in the main table, displaying its status, IP address, and other details
Troubleshooting Common Issues
No nodes found during IP scan?
Verify network connectivity between EDCC and node BMC
Check if BMC IP is in the scan range
Ensure node is powered on and BMC is initialized
Assignment fails with authentication error?
Verify BMC credentials are correct
Try using Customized BMC ID/Password option
Check if BMC password has been changed outside EDCC
Node appears in Inventory but can't be assigned?
Confirm you have selected both Organization AND POD
Verify you have Admin permissions for the target POD
Check if node is already assigned to another POD
Congratulations!
You have successfully set up your first management environment and brought a node under full EDCC control. You are now ready to explore the full range of monitoring and configuration features.
Next Steps:
Chapter 5: Using the Dashboard to get a health overview
Chapter 6: In-Depth Node Management to explore the detailed settings of your node
💡 Pro Tip: Now that you have a working POD, you can assign additional nodes from the Inventory using the same process, or explore bulk assignment operations for multiple nodes.