
Management Hierarchy
Learn how to navigate and organize your infrastructure using EDCC's unique three-tier management system.
ℹ️ Essential Concepts
Available to: All users
Purpose: Overview of EDCC platform and capabilities
Important: Understanding this hierarchy is crucial for all EDCC operations
Why This Hierarchy is Your First Step
Before you can manage any node, you must understand how EDCC makes them available to you. A newly discovered node is not immediately configurable. It must first be placed into a POD.
Note on Terminology: Node vs. Server
In EDCC documentation and within the interface, physical machines are referred to as Nodes. For clarity, this manual uses "Node" and "Server" interchangeably. They both refer to the same physical hardware you are managing.
The Golden Rule of EDCC
The Golden Rule of EDCC
MONITORING can be done from any scope (Organization, Hierarchy View, or POD).
CONFIGURATION can ONLY be done from the POD scope.
💡 Troubleshooting Tip: If the CONFIGURE menu is ever grayed out or missing, check your currently selected scope in the header. You must select a POD to make any configuration changes.
How Nodes Become Manageable
The process follows a clear lifecycle that ensures no node can be accidentally modified until it is explicitly placed into a designated management environment.
Device Lifecycle Process
Registration → Inventory → Assignment → ManagementRegistration (Not Automatic Discovery) A node must be explicitly registered by an administrator to be recognized by EDCC. This is not an automatic background process. An Organization Admin must navigate to the System → Inventory page and use the
+ Register Devicefunction (e.g., via IP Scan, Manual Entry, or CSV Import) to find and add the node to the platform.Inventory Once registered, nodes are placed in the Organization-level Inventory. At this stage, they are merely assets in a list—you cannot monitor or configure them yet.
Assignment An administrator must manually assign a node from the Inventory to a specific POD.
Management Once inside a POD, the node becomes fully manageable. You can now monitor its health, perform operations, and apply configurations.
Critical Limitation: Devices in the Organization Inventory are in an "asset list" state and cannot be managed until assigned to a POD.
The Three Tiers at a Glance
EDCC's management structure is composed of three distinct levels. This diagram and table break down the purpose and capabilities of each.
Organization
🏢
Global Management & Asset Holding: The highest level, representing your entire company. It manages system-wide settings, users, and the central Inventory of all unassigned nodes. It also provides a monitoring overview of all assets.
Hierarchy View
📂
Aggregated Monitoring: An optional folder used purely for organizational convenience. It groups multiple PODs (e.g., by region or department) into a single, consolidated monitoring view. It has no configuration capabilities.
POD
📦
Hands-On Management & Configuration: The fundamental, operational unit. Assigning a node to a POD "activates" it for full management. It is only at this level that you can perform all configuration tasks.
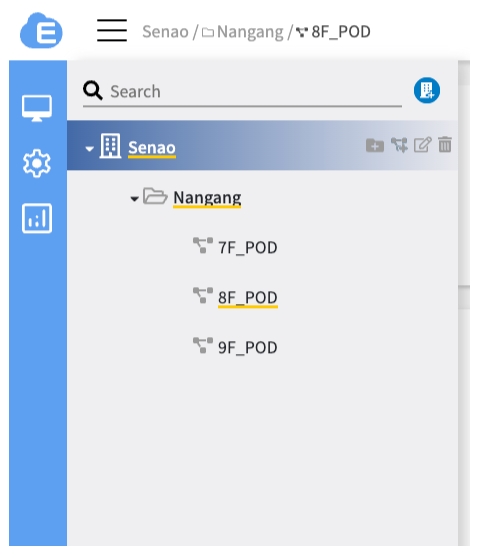
How to Switch Between Management Scopes
Step-by-step Navigation:
Access Navigation Menu
Click the hamburger menu (☰) in the top-left corner
Choose Management Scope
Select from the Management Tree to choose your scope:
Organization level: See all authorized PODs
Hierarchy View: See PODs within that grouping
POD level: Access full management capabilities
Verify Current Selection
Check the header display to confirm your current scope
Observe Menu Changes
Notice how available menu options change based on your selection
Permission-Based Filtering
What you see depends on your role:
Organization Admin: Sees all PODs automatically
POD Admin/Viewer: Only sees authorized PODs
Example: If you have access to POD1 and POD3, selecting "Organization" will show devices from POD1+3 only (POD2 filtered out)
Example Scenarios: Structuring Your Hierarchy
The flexibility of the hierarchy allows you to model your real-world operational structure. Here are two common scenarios to illustrate how you can leverage HVs and multiple PODs.
Scenario 1: The Multi-Site Enterprise
Goal: A company with offices and data centers in different regions needs to provide both regional oversight and local administrative control.
Organization: Global Tech Inc.
├── Hierarchy View: Americas
│   ├── POD: New York - Production DC
│   └── POD: Chicago - R&D Lab
└── Hierarchy View: EMEA
    ├── POD: London Office - Rack A
    └── POD: Frankfurt - DR Site
How this helps:
Regional Oversight: A manager can select the Americas HV to monitor the health of both the NY and Chicago sites at a glance.
Delegated Administration: A local admin in London can be given access only to the London Office - Rack A POD to manage their local nodes without affecting any other site.
Clear Separation: Production and R&D environments are in separate PODs, preventing accidental changes to critical systems.
Scenario 2: The Managed Service Provider (MSP)
Goal: An MSP uses EDCC to manage the server infrastructure for multiple, separate clients, ensuring strict security segregation.
Organization: Secure Cloud Services
├── POD: Client A - Web Servers
├── POD: Client B - Database Cluster
└── POD: Client C - Full Infrastructure
How this helps:
Client Segregation: Each client's infrastructure is isolated in its own POD. This is crucial for security and billing.
Granular Permissions: The MSP can grant a technician from Client A access only to the Client A - Web Servers POD. They can see and manage their own nodes but are completely unaware of Client B or C.
Simplified Management: The MSP's central administrators can select the Secure Cloud Services Organization to get a high-level monitoring overview of all their clients' environments.
Chapter Summary & Key Takeaways
The Golden Rule: You can Monitor anywhere, but you can only Configure inside a POD.
Nodes Must Be Assigned: A node discovered in the Inventory is not manageable until you assign it to a POD.
POD is the Action Zone: All hands-on tasks, from running operations to applying policies, happen at the POD level.
Structure for Your Needs: Use HVs and PODs to model your real-world administrative and geographical structure.
Scope Switching: Use hamburger menu → Management Tree to change scope and check the header to confirm your current scope.
Permission Filtering: You only see resources you have access to, and what you see depends on your selected scope.
What's Next: Now that you understand the hierarchy, Next Chanpter will walk you through setting up your first POD and assigning devices for management.
💡 Quick Reference: Keep the Golden Rule in mind throughout this manual - whenever configuration options seem missing, check your current scope first!