
Firmware Provisioning
Chapter 11: Automating Firmware Provisioning
Centrally manage and schedule automated BMC and BIOS firmware updates for all nodes in your POD.
⚠️ Configuration Access Required
Required Role: POD Admin or Organization Admin
Required Scope: POD level only
Restriction: Module disabled when Organization or Hierarchy View selected
Overview: Your Firmware Patching Command Center
The CONFIGURE → Firmware Provisioning page is your "set-and-forget" command center for maintaining firmware consistency and security across your entire POD. Instead of updating nodes one by one, this feature allows you to create a centralized firmware library and define safe maintenance windows for automated, unattended updates.
The primary goals are to:
Standardize: Ensure all nodes of the same model run the exact same firmware version.
Secure: Regularly and automatically deploy critical security patches.
Save Time: Eliminate the need for manual, repetitive update tasks.
The settings on this page are separated into BMC and BIOS tabs, but their functionality is identical. You must configure each tab independently.
Automated vs. Manual Updates: Which Tool to Use?
It's crucial to understand the difference between the two firmware update tools in EDCC:
Use This Page (
CONFIGURE → Firmware Provision): For automated, scheduled, POD-wide updates. This is for routine maintenance and ensuring your entire fleet is compliant.Use Node Detail (
MANAGE → Node Detail → Operations): For immediate, manual updates on a single node. This is for urgent, one-off patches or testing.
The 3-Step Automation Workflow
The process for setting up automated updates is straightforward. You first tell EDCC what to install, then when to install it, and finally, you activate the process.
Build Firmware Library → Define Maintenance Window → Activate Automation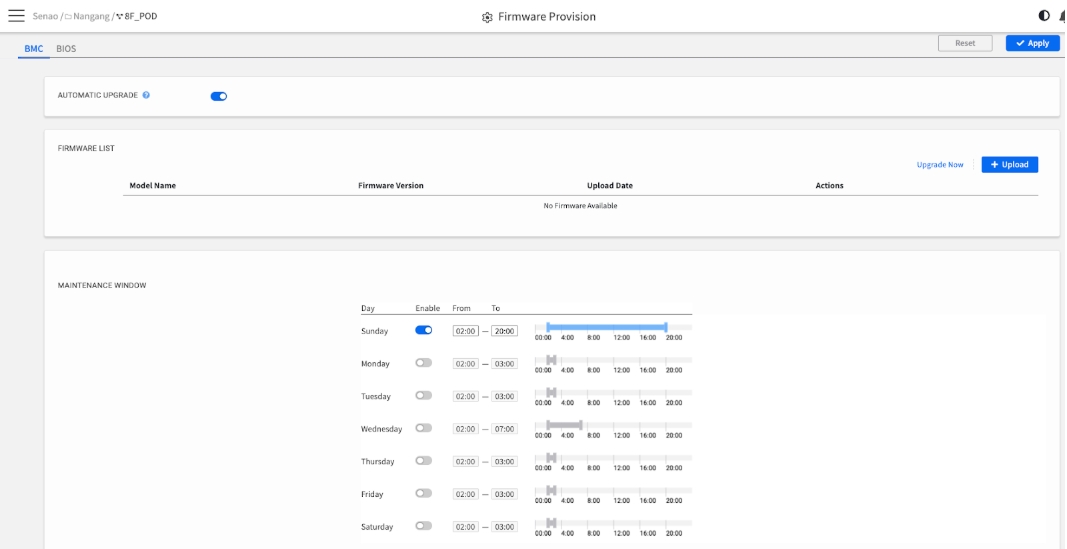
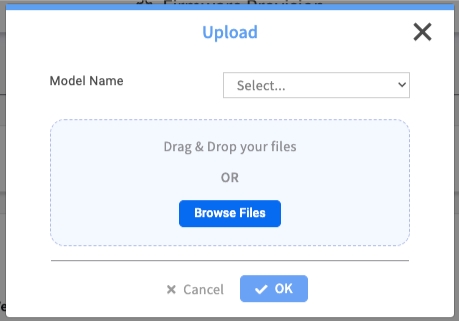
Step 1: Build Your Firmware Library
Before you can automate updates, you must upload the approved firmware files to the EDCC library. This list serves as the single source of truth for the target firmware versions for each node model.
Process:
Click the + Upload button in the FIRMWARE LIST section
In the Upload dialog, first select the Model Name this firmware applies to
Next, drag and drop the firmware file or use the Browse Files button to select it
Click OK to upload. The file will now appear in the list
Upgrade Now: Clicking this link next to a firmware file provides an override option. It will immediately push this update to all applicable nodes in the POD, ignoring the maintenance window. Use this for urgent, fleet-wide patches.
Important: One Version Per Model
The library allows only one firmware version per model name. If you upload a new file for a model that already has one (e.g., uploading a new BIOS for the EAS1210), the new file will overwrite and replace the old one.
Step 2: Define Your Safe Maintenance Window
The MAINTENANCE WINDOW is a weekly schedule that tells EDCC when it is safe to perform the automated updates. This is the most critical step for preventing service disruptions.
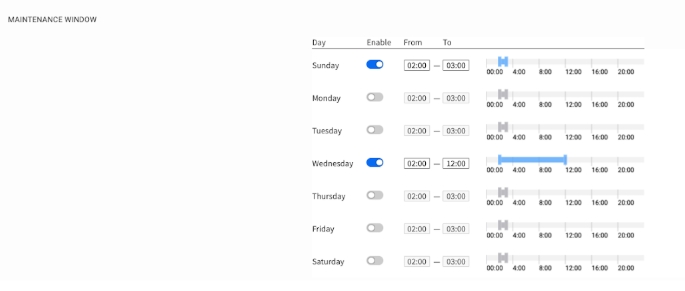
How it works:
Use the Enable toggle for each day of the week to activate the window for that day
Use the visual slider or the From/To fields to set the exact time range
The schedule repeats every week
Daily Control
You can enable or disable the window for each day independently, allowing you to create flexible schedules (e.g., weekends only).
Single Time Slot
Only one continuous time slot can be set per day.
POD Timezone
The times you set here are based on the POD's local timezone, which is configured in CONFIGURE > General Settings. This ensures maintenance happens at the correct local time.
💡 Best Practice: Schedule for Off-Peak Hours
Firmware updates can cause node reboots and temporary downtime. Always schedule your maintenance window for periods of low business activity (e.g., overnight or on weekends) to minimize impact.
Best Practice: Schedule for Off-Peak Hours
Firmware updates can cause node reboots and temporary downtime. Always schedule your maintenance window for periods of low business activity (e.g., overnight or on weekends) to minimize impact.
Step 3: Activate the Automation & Save Your Policy
Once your firmware is uploaded and your maintenance window is set, the final step is to activate the entire process and save your configuration as a new policy for the POD.
Process:
Turn on the AUTOMATIC UPGRADE toggle at the top of the page
Crucially, click the Apply button in the top-right corner to save all your changes (the firmware list, the schedule, and the activation toggle)
How the Automation Works:
When enabled, EDCC periodically checks the firmware version of each node in the POD
If a node's firmware is older than the version in your Firmware List for its model, EDCC schedules it for an upgrade
The upgrade is only performed during the next available Maintenance Window
Firmware Management Best Practices
Planning Your Firmware Strategy
Testing Strategy:
Test Environment First: Always validate new firmware on non-critical nodes before POD-wide deployment
Staged Rollouts: Consider updating nodes in phases rather than all at once
Rollback Plan: Ensure you can revert to previous firmware if issues arise
Maintenance Window Strategies:
24/7 Operations
Weekends, 2-4 AM
Minimize business impact
Standard Business
Weeknights after hours
Avoid peak business hours
Development Environment
More flexible windows
Lower criticality allows broader windows
Critical Infrastructure
Extended weekend windows
Allow time for thorough validation
Managing Firmware Conflicts
Version Conflicts:
Different Model Requirements: Some models may need specific firmware versions for compatibility
Staged Environments: Development and production may intentionally run different versions
Compliance Requirements: Some environments require specific certified versions
Resolution Strategies:
Use individual node overrides in Node Detail → Services → Subscription for exceptions
Create separate PODs for different firmware requirements
Document version dependencies and compatibility matrices
Monitoring and Validation
Post-Update Verification:
Check Dashboard Health: Verify POD health status after maintenance windows
Review BMC SEL: Check for any firmware-related events or errors
Validate Functionality: Ensure all management functions work correctly
Service Health: Verify Redfish services remain operational
Failure Recovery:
Automatic Rollback: EDCC includes automatic rollback on update failures
Manual Intervention: Some failures may require manual recovery via Operations tab
Support Escalation: Document firmware version details for vendor support if needed
Chapter Summary & Key Takeaways
Purpose: This page is for automated, POD-wide firmware updates. Use it to set a standard policy and forget it
Safety First: The Maintenance Window is your most important safety feature. Always schedule it for off-peak hours
Urgent Patches: The Upgrade Now link is your override for pushing immediate, fleet-wide updates
Final Step: No changes take effect until you click the Apply button
POD Scope Required: This configuration feature is only available when a POD is selected
What's Next: Chapter 12 will explore Managing Services Profiles, where you'll learn to configure and deploy standardized service monitoring policies across your infrastructure.
💡 Pro Tip: Test firmware updates on a small subset of non-critical nodes first, then use the automated system to roll out to your entire POD once validated.