
Inventory
Chapter 16.1: Managing the Device Inventory
Learn how to register, organize, and assign your nodes using the central Inventory, the starting point for all device lifecycle management in EDCC.
🔒 Organization Administrator Only
Required Role: Organization Admin only
Access Level: Complete EDCC platform administration
Restriction: POD Admin and Viewers cannot access this section
Purpose: Device registration and POD assignment
Overview: Your Central Hardware Asset Registry
The System → Inventory page is the master list of all nodes registered to your Organization. Think of it as a central holding area or asset registry for your hardware. Every node's journey in EDCC begins and ends here.
Before a node can be monitored or configured, it must first be registered and exist within this Inventory. This page provides the tools to manage the entire lifecycle of your hardware, from initial registration to final decommissioning.
Critical Limitation: Devices in Organization Inventory are in "asset list" state and cannot be managed until assigned to a POD.
The Node Lifecycle in EDCC
Every node managed by EDCC follows a clear, four-stage lifecycle. Understanding this process is key to effective device management. The actions you take on this page directly move a node between these stages.
Registration → Inventory → Assignment → Active ManagementStage Definitions
1. Registration
Initial discovery
Basic identifiers recorded
Introduce node to EDCC platform
2. Inventory
Asset list only
No management possible
Holding area for unassigned nodes
3. Assignment
POD assignment
Inherits POD context
Prepare for active management
4. Active Management
Fully operational
All EDCC features unlocked
Complete monitoring and configuration
Detailed Stage Descriptions
Stage 1: Registration
Registration marks the beginning of a node's journey in EDCC. During this phase, a physical node is introduced to the platform through automated network scanning, manual serial number entry, or bulk CSV import.
What Happens During Registration:
EDCC creates a basic hardware record with essential identifiers.
System performs initial BMC connectivity verification.
Basic hardware model and capabilities are detected.
Node receives unique internal EDCC identifier.
Key Information Recorded:
Hardware serial number (primary identifier)
Model name and specifications
BMC MAC address and network information
Discovery method, timestamp, and registering user
Important Limitations:
At this stage, the node exists purely as a database entry. No management capabilities are active—administrators cannot access monitoring, sensors, or configuration options.
Stage 2: Inventory
The inventory phase serves as a secure holding area where nodes exist as catalogued assets. Think of this like having equipment stored in a warehouse—you have complete documentation, but items aren't yet deployed operationally.
Current State:
Node appears in
System → Inventorylist with specifications visible.POD column remains blank (indicating unassigned status).
No active BMC communication occurs.
Only Organization Administrators can see and manage inventory devices.
What You Can Do:
View hardware specifications and identifiers.
Assign to POD (progresses to Stage 3).
De-register device (removes from EDCC entirely).
Perform bulk operations on multiple devices.
Critical Restrictions: These limitations are intentional for security:
No monitoring capabilities - Cannot view Dashboard health status.
No sensor access - Cannot check temperature, fans, or voltage.
No remote operations - Cannot power control, firmware updates, or KVM access.
No event logging - BMC SEL and system events not accessible.
No configuration management - Cannot apply policies or settings.
Stage 3: Assignment
Assignment is the critical transition where nodes move from passive assets to active infrastructure components. An Organization Administrator assigns devices to specific PODs, triggering integration processes.
Assignment Process:
Admin selects node(s) from inventory (blank POD column).
Target POD and credentials are specified.
EDCC initiates BMC connection using POD default credentials.
Node inherits POD-level configuration context.
What the Node Inherits from POD:
Default BMC username and password.
POD timezone settings for all timestamps.
Service monitoring profiles and policies.
Firmware provisioning schedules and maintenance windows.
Technical Verification:
The system performs BMC connectivity tests, initial hardware capability assessments, and begins integrating with POD-level monitoring systems. Failed authentication prevents successful assignment.
Stage 4: Active Management
Active management represents full operational capability where all EDCC features become available. Nodes appear in MANAGE→ Node List for authorized users and participate completely in platform monitoring and management.
Complete Feature Access:
Monitoring - Real-time Dashboard integration and health status.
Sensors - Live temperature, voltage, fan speed, and power monitoring.
Event Logging - BMC SEL access and platform event correlation.
Remote Operations - Power control, firmware updates, ISO mounting, KVM/SOL access.
Configuration Management - Service profiles and automated firmware provisioning.
Policy Application - POD-wide settings and maintenance schedules.
User Access Control:
POD Administrators: Full operations and configuration access.
POD Viewers: Monitor-only access to same resources.
Access automatically filtered based on user's specific POD permissions.
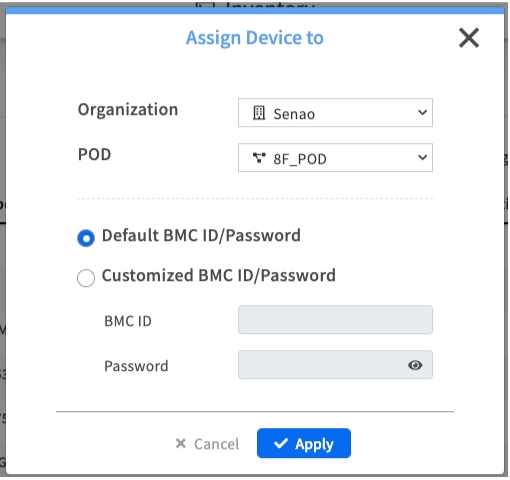
The Inventory Interface
The main Inventory page provides a comprehensive list of all nodes across your entire Organization, giving you a complete overview of your hardware assets and their current lifecycle stage.
The Inventory List Explained
Name / Model
The node's user-defined name and its hardware model.
Organization
The top-level organization that this node is registered to.
Serial Number
The unique hardware serial number, your primary identifier for asset tracking.
IP / MAC Address
The network identifiers for the node's BMC, crucial for troubleshooting connectivity.
POD
The Most Critical Column. This tells you the node's current lifecycle stage at a glance. If blank = Inventory (Stage 2, unmanaged). If it shows a POD name = Active Management (Stage 4).
Registered Time / By
An audit trail showing when the node was added to EDCC and by which user.
Stage 1: Bringing New Nodes into EDCC (Registration)
Overview: Registration is the initial step where a physical node is introduced to the EDCC platform. You have three methods to choose from, each suited for different scenarios.
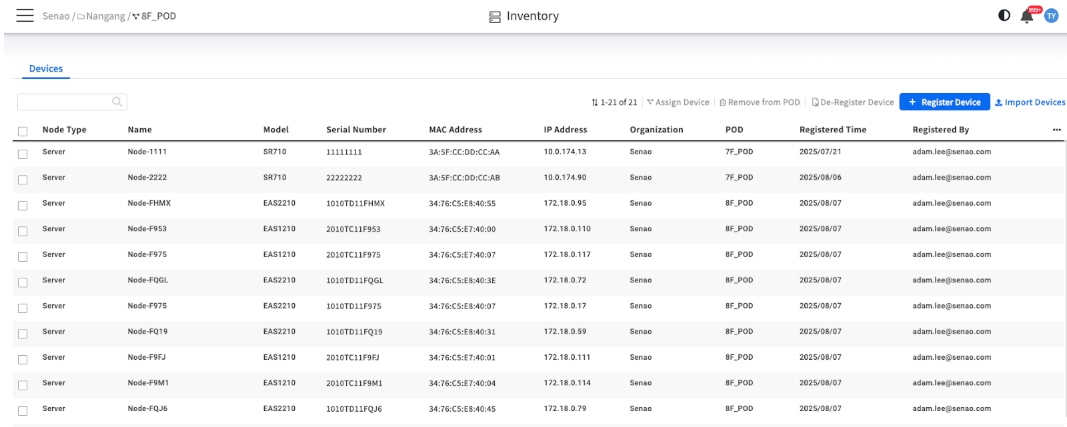
Method A: Registering via IP Scan
Use this for: Automatically discovering new, unknown nodes on your local network. Best method when you have just physically racked new servers.
Process:
Click the + Register Device button.
In the
Pending Approvaltab, enter a Start IP and End IP to define the network range to scan.Click Scan. EDCC will list any compatible nodes it finds.
Check the box next to the devices you wish to add and click Register.
Method B: Registering Manually
Use this for: Adding a specific, known node, especially if it's on a different network segment or you prefer to register by hardware identifier.
Process:
Click the + Register Device button.
Select the
Manuallytab.Enter the Serial Number of the node and click Register.
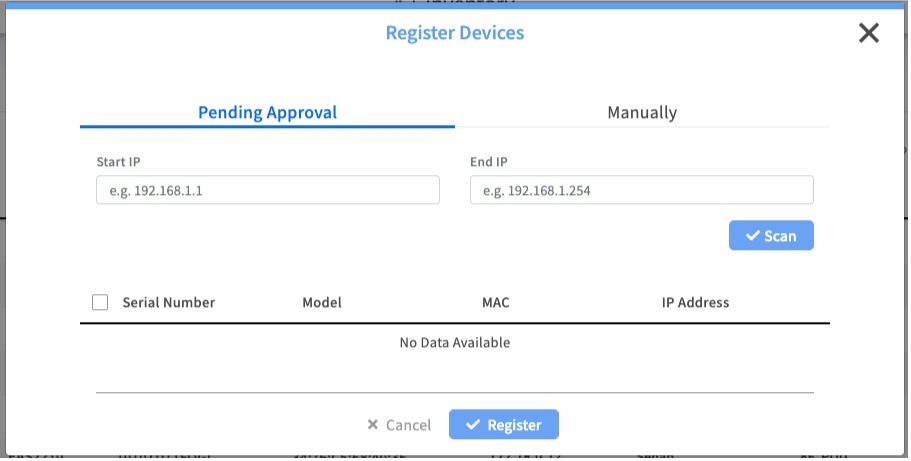
Method C: Importing Devices in Bulk
Use this for: Registering a large number of nodes at once. Most efficient method for initial data center deployments.
Process:
Click the Import Devices button.
Click the download the template link to get the required CSV file format.
Fill out the template with your node information (up to 100 entries).
Drag and drop the completed CSV file onto the upload area and click Apply.
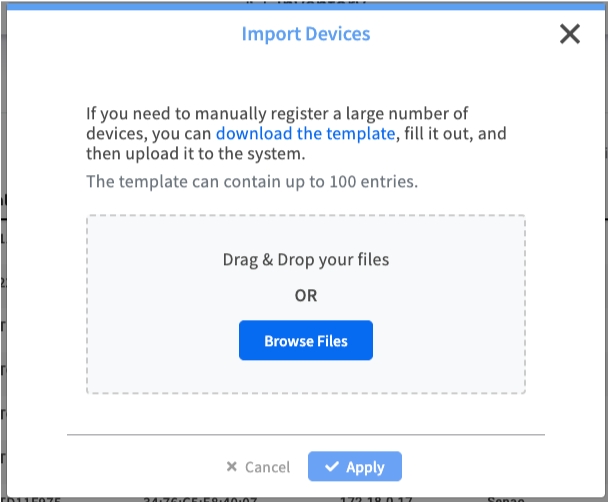
Stage 2 & 3: Activating Nodes for Management (Assignment)
Assigning a node moves it from the passive Inventory (Stage 2) into an active, manageable state within a POD (Stage 4). This action "turns on" all of EDCC's management capabilities for that node.
Process:
In the Inventory list, select one or more nodes that have a blank POD column.
Click the Assign Device button from the top toolbar.
In the dialog, select the target Organization and POD.
Choose the BMC Authentication method.
Click Apply. The node is now fully manageable.
Pro Tip: Use a "Staging" POD
Consider creating a dedicated "Staging" or "Onboarding" POD. Assign all new nodes here first to perform initial health checks and firmware updates before moving them to their final production POD.
Stage 4: Retiring Nodes from Service (Decommissioning)
When a node needs to be repurposed or retired, you have two irreversible options for removing it from active management. Choosing the correct one is critical to avoid accidental data loss.
Remove from POD
Moves an active node from its POD back into the central Inventory.
The node becomes unmanaged. All history, event logs (including BMC SEL), and configuration records within that POD are permanently lost.
When you need to re-assign a node to a different POD or temporarily take it out of active management.
De-register Device
Permanently deletes the node's record from the entire EDCC platform.
The node is completely removed from EDCC. To manage it again, you must re-register it from scratch.
Only when a node is being permanently decommissioned and will no longer be managed by EDCC.
Common Mistake: Confusing "Remove" with "De-register"
Always double-check your intention. If you simply want to move a node, use Remove from POD. Only use De-register Device for hardware that is being permanently retired. These actions cannot be undone.
Chapter Summary & Key Takeaways
Inventory is the Holding Area: Nodes in the Inventory are unmanaged assets waiting for assignment.
Assignment Activates Management: A node MUST be assigned to a POD before you can monitor or configure it.
Use Bulk Import: For large deployments, the "Import Devices" feature is the most efficient registration method.
Remove vs. De-register: Remove from POD is for re-assignment (and deletes POD history). De-register is for permanent deletion from EDCC. Choose carefully.
Organization Admin Only: This entire functionality is restricted to Organization Administrators.
What's Next: Chapter 16.2 will explore EDCC Platform Health monitoring, where you'll learn to monitor the EDCC system itself.
💡 Pro Tip: Document your node lifecycle procedures, especially the criteria for moving nodes between PODs and the decommissioning approval process.