Loading...
Loading...
Loading...
Loading...
Loading...
Loading...
Cloud Lite 802.11ax 4×4 Dual Band Managed Indoor Wireless Access Point (ECW212L)
This Quick Start Guide is designed to guide you through the installation of the Cloud6 4x4 Lite Access Point, model ECW212L, including hardware mounting and configuration.
The EnGenius Cloud is primarily accessible with a web browser or mobile app. Before signing up for the EnGenius Cloud Service or logging on to the EnGenius Cloud Platform to manage your network, ensure that you've downloaded the right app and used the supported browser.
EnGenius Cloud To-Go (iOS/ Android supported)
⬇️
Google Chrome (57.0.2987.110 and later)
Microsoft Edge (80.0.361.103 and later)
Mozilla Firefox (52.0 and later)
Before you get started, please make sure your network environment is DHCP-enabled. EnGenius Cloud Access Points (ECW series) are default assigned an IP address dynamically by the DHCP server.
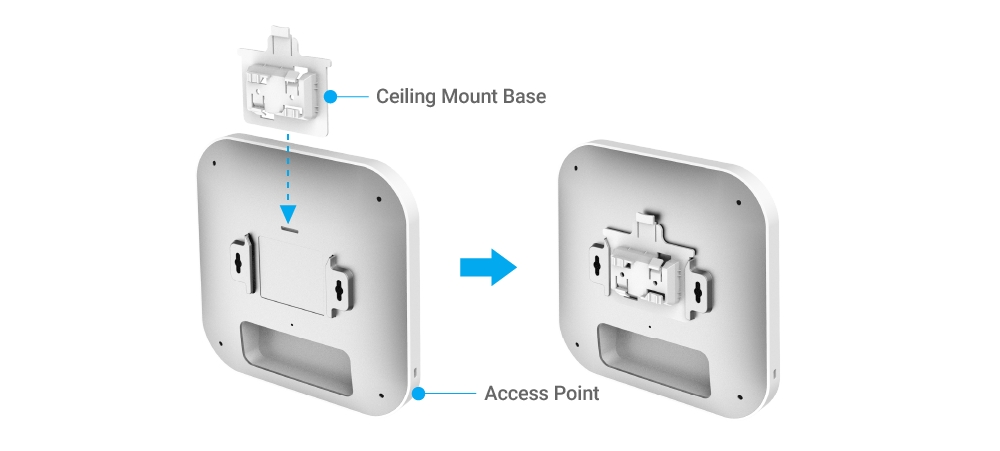
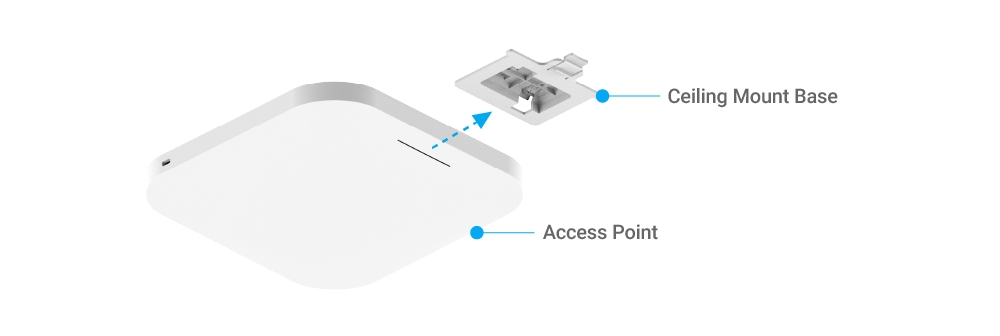
The access point can be mounted on the Ceiling and Wall, and please perform the steps for the appropriate installation:
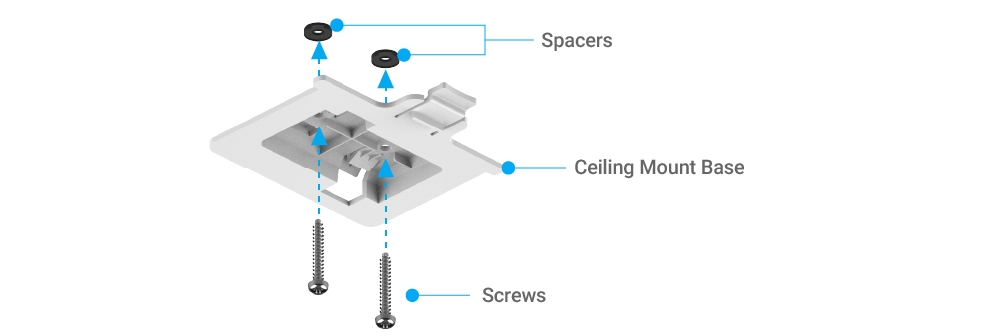
Slide the Ceiling Mount Base into the slot of the Access Point.
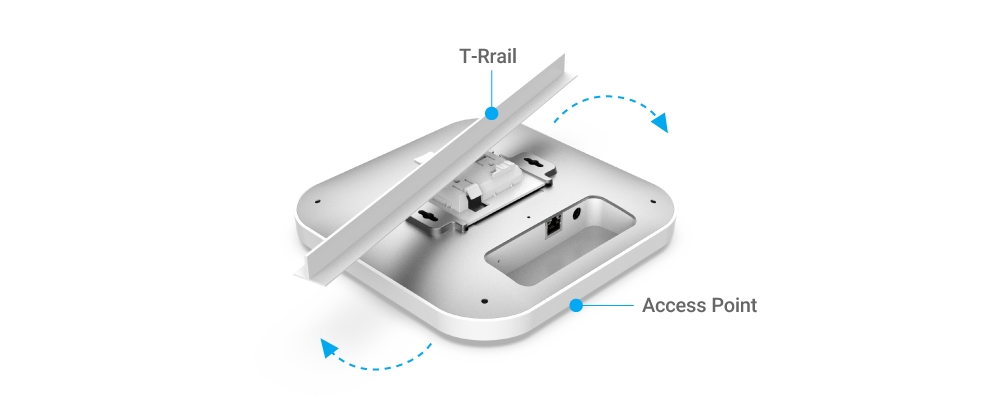
2. Slightly Hook the ceiling mount bracket onto the T-Rail until you hear a click sound.
Screw the included Screws into the Ceiling Mount Base with Spacers, and the Screws unto the surface until they are flush with the surface.
2. Slide the Access Point into the Ceiling Mount Base.
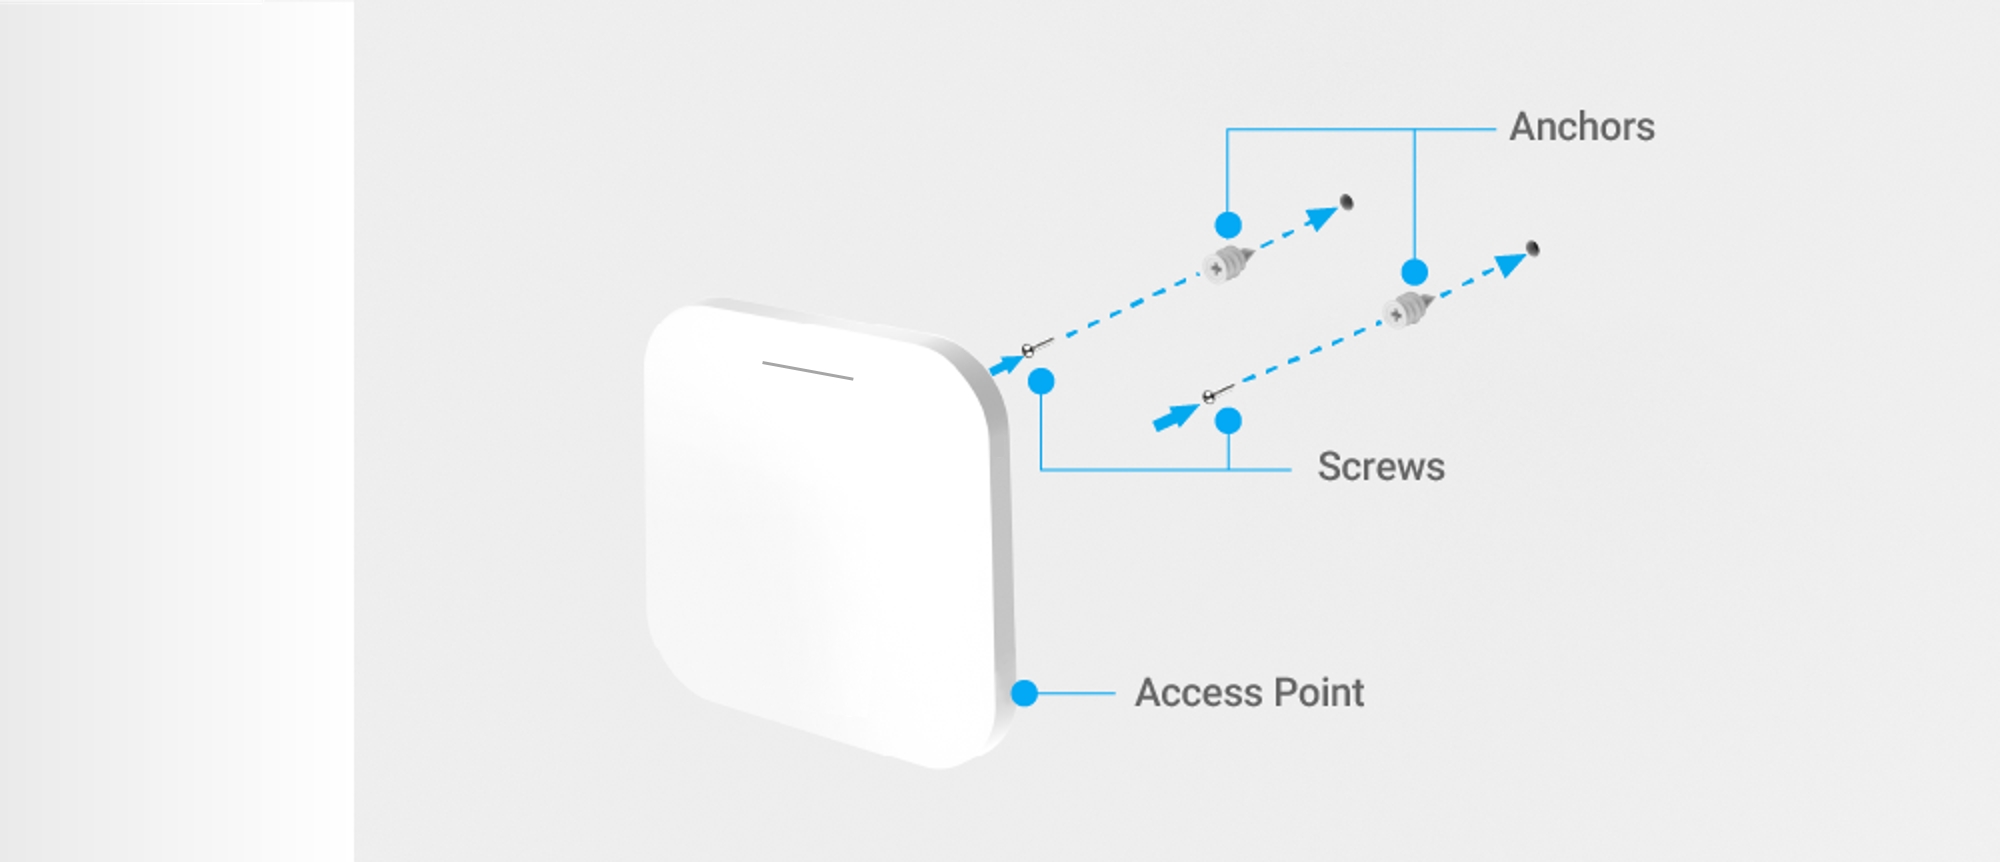
1. Determine where the Access Point is to be placed and mark the location on the surface for the two mounting holes. Use the appropriate drill bit to drill two 8.1mm diagram and 26mm depth holes in the markings.
2. Screw the Anchors into the holes until they are flush with the wall; screw the included Screws into the Anchors, but leave the screw head sticking out so you can hang the Access Point on it.
4. Hang the Access Point against wall onto the Screw heads.
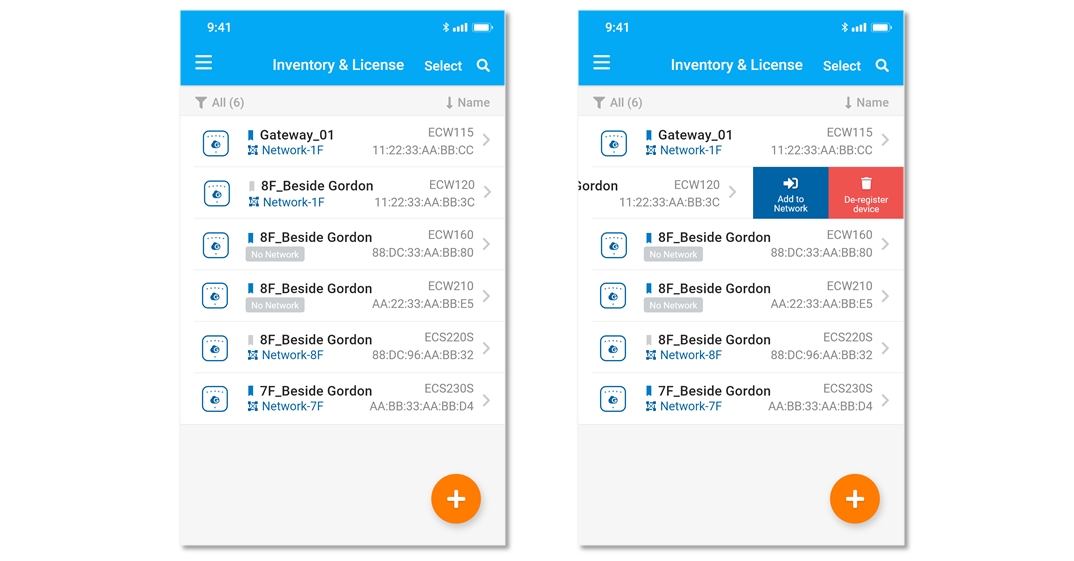
You can register the device either by Cloud To-Go mobile app or the EnGenius Cloud platform.
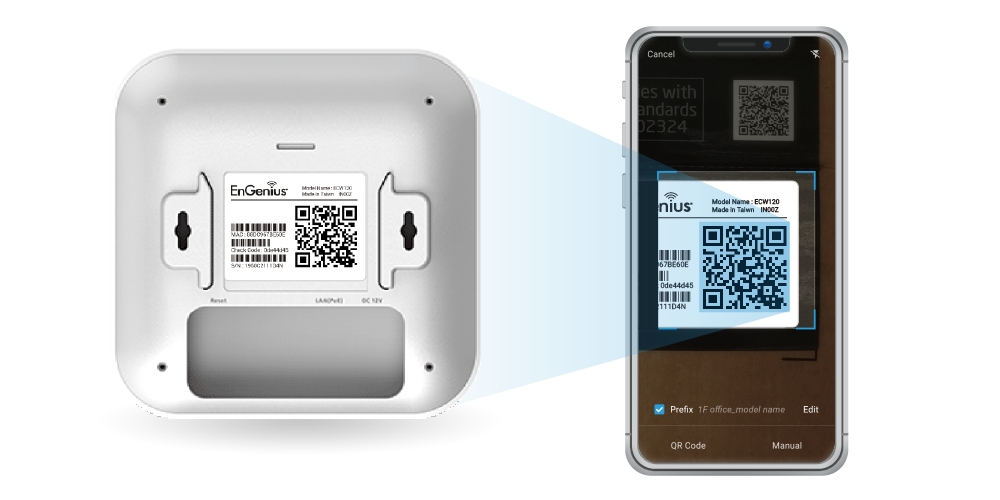
Open and log in to the EnGenius Cloud To-Go mobile app.
Scan the QR code on the back of the device via the app.
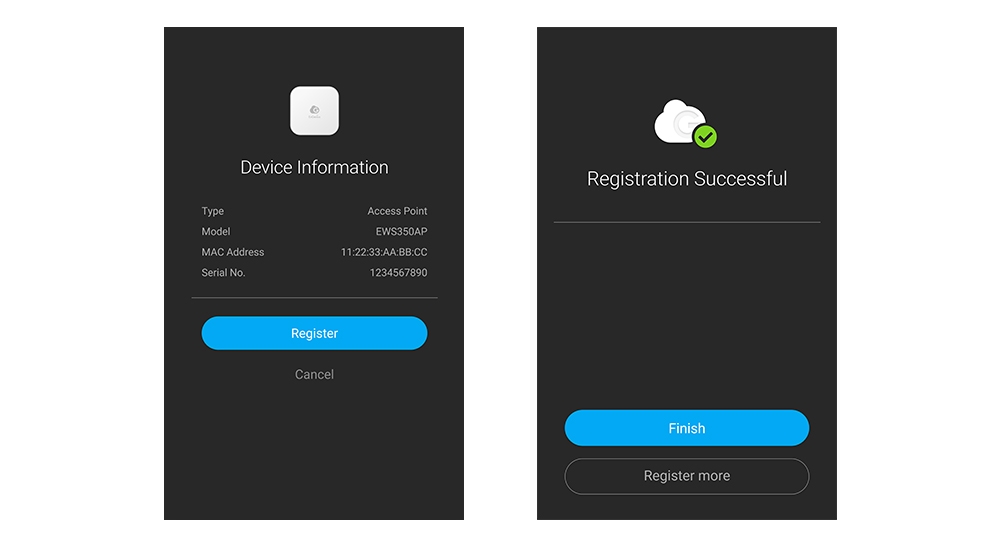
3. If the camera successfully scans a QR code, the app will display the device Information. You could tap "Register" to complete the Registration.
4. Registered devices will be shown on the Inventory&License page. Slide left the device and click "Add to Network" add the device to your personalized Network.
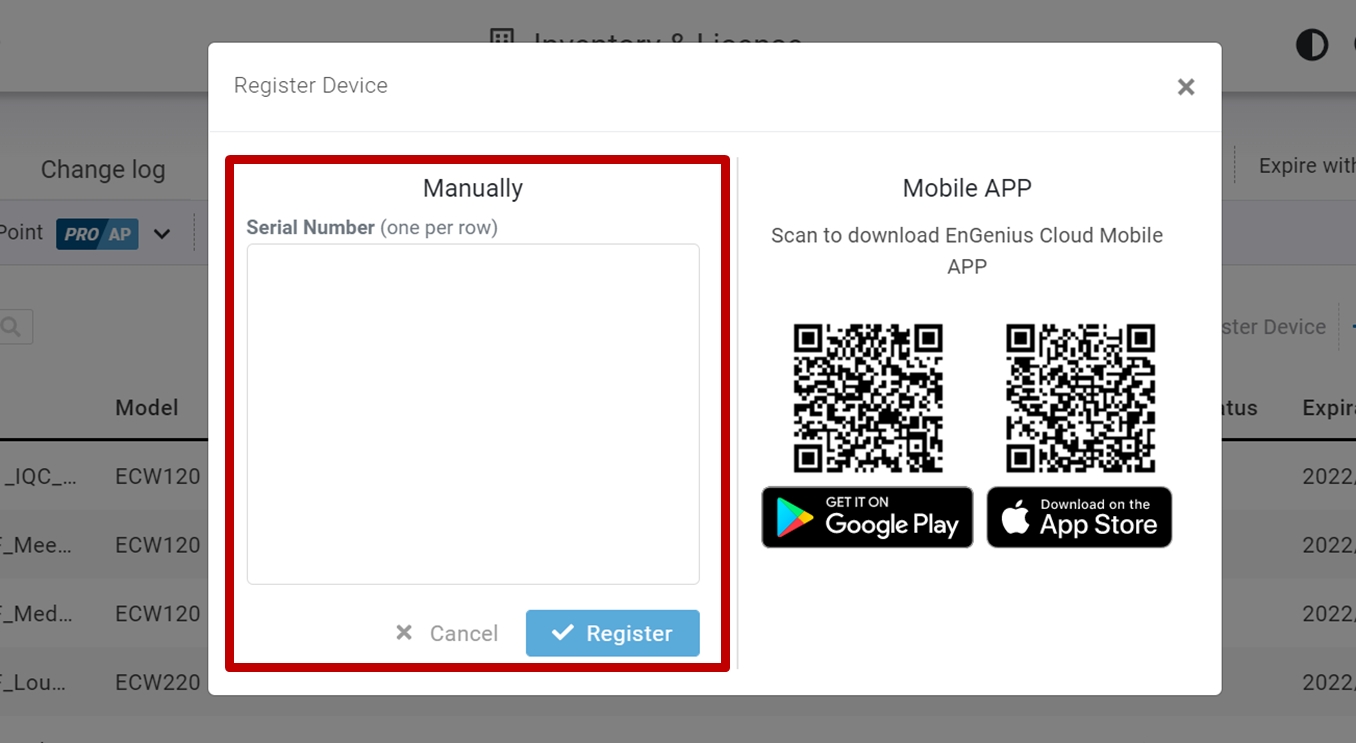
Log in to the EnGenius Cloud Platform: .
Go to the home > Inventory&License page and click "Register Device".
Enter the Serial Number of the device(s) for device registration. Please refer to "".
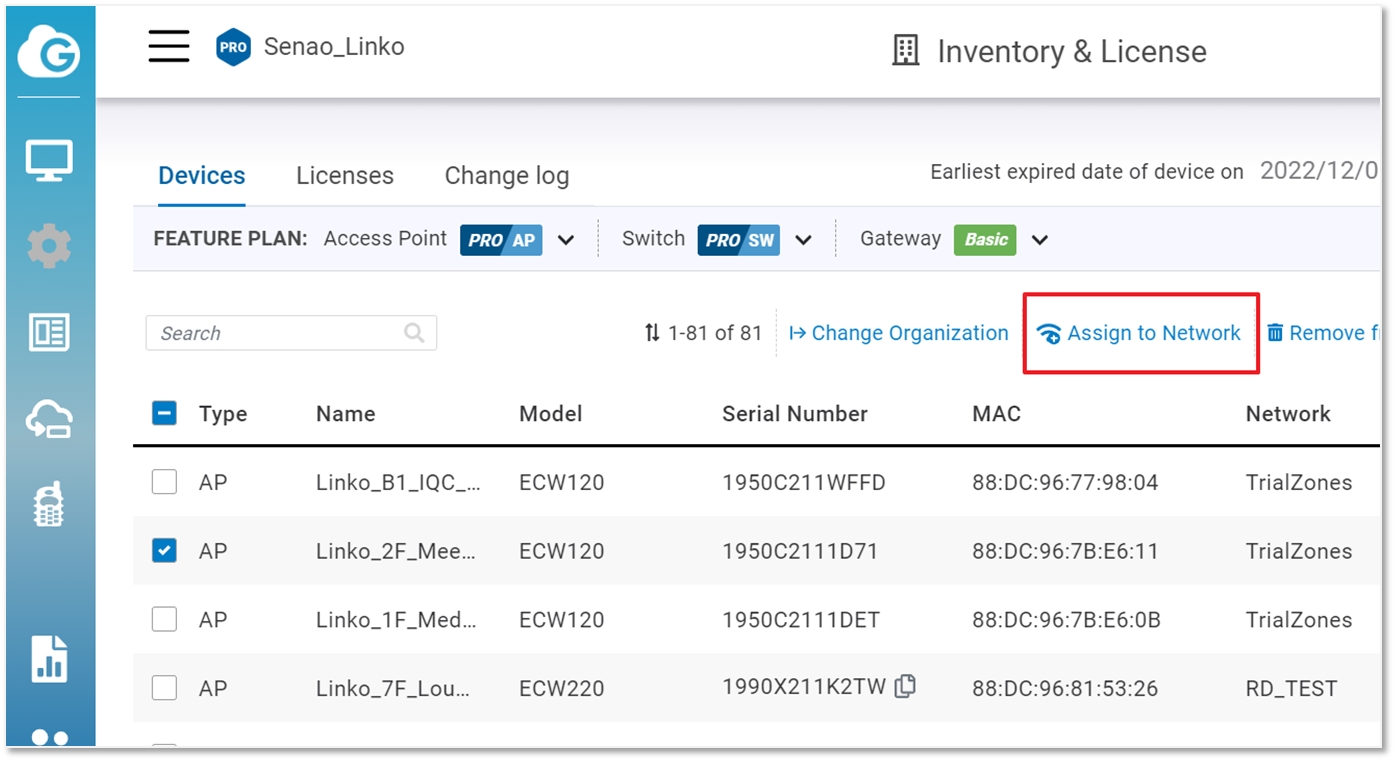
4. Select the registered device and click "Assign to Network" to add the device to your personalized Network.
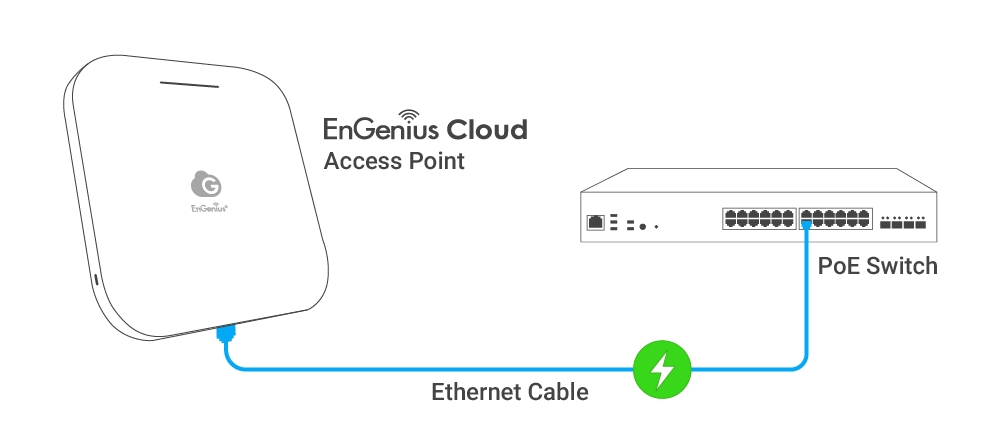
The EnGenius Cloud AP devices can be powered by any of the following:
EnGenius Cloud PoE Switch or 802.3af/ 802.3at PoE+ compliant Switch
EnGenius PoE adaptor (EPA5006GP/EPA5006GAT/EPA5060XBT)
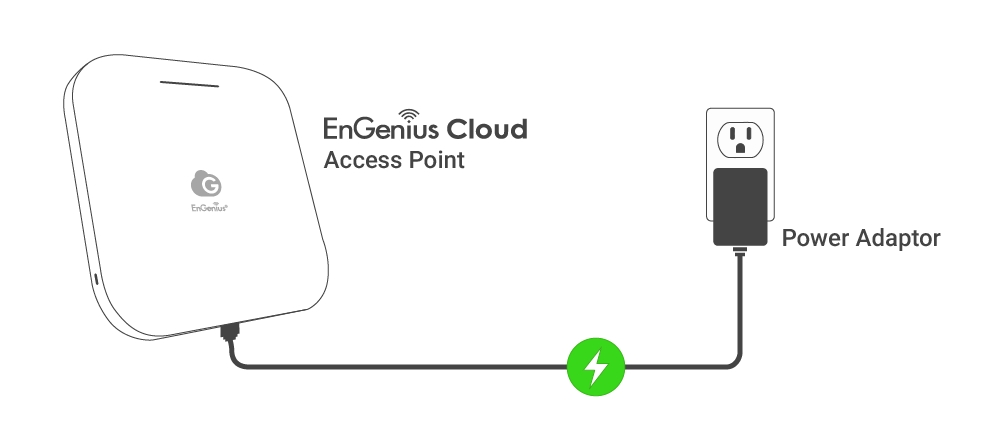
Power Adapter (DC 12V/2A power input)
Do not use both power sources at the same time.
Connect the Ethernet cable from the EnGenius Cloud AP directly to the PoE port of the PoE switch.
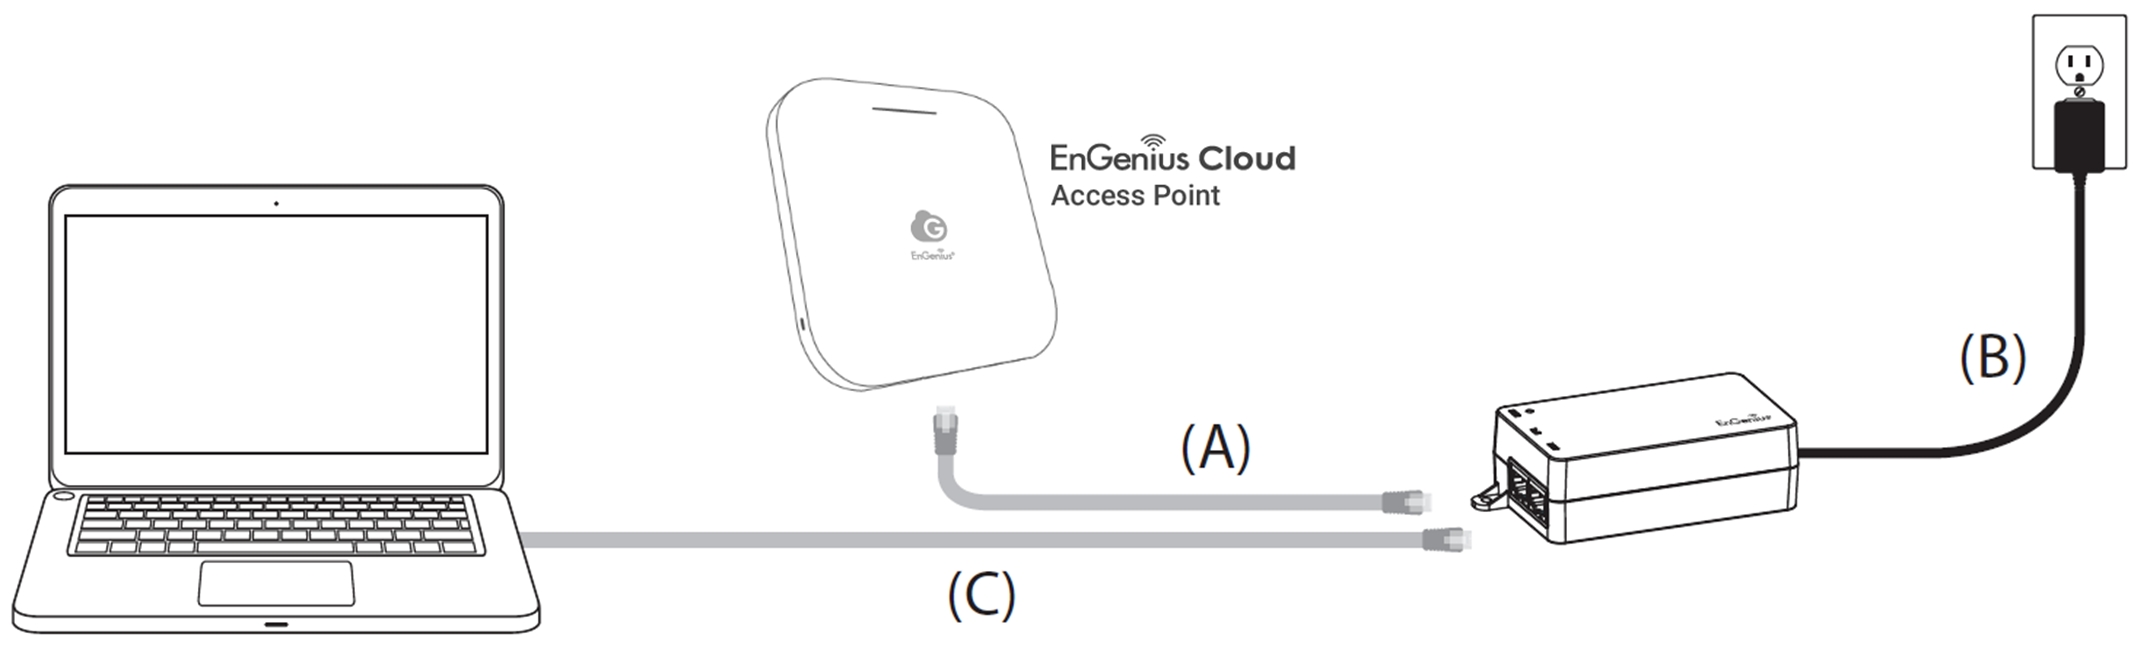
(A) Connect one end of the Ethernet cable into the LAN (PoE) port of EnGenius Cloud AP and the other end to the PoE port on the PoE Adapter.
(B) Connect the power cord with the PoE Adapter and plug the other end into an electrical outlet. (C) Connect the second Ethernet cable into the LAN port of the PoE Adapter and the other end to the Ethernet port on the computer.
Connect the Power Cord to the adapter, and then plug the Power Cord into the power outlet.
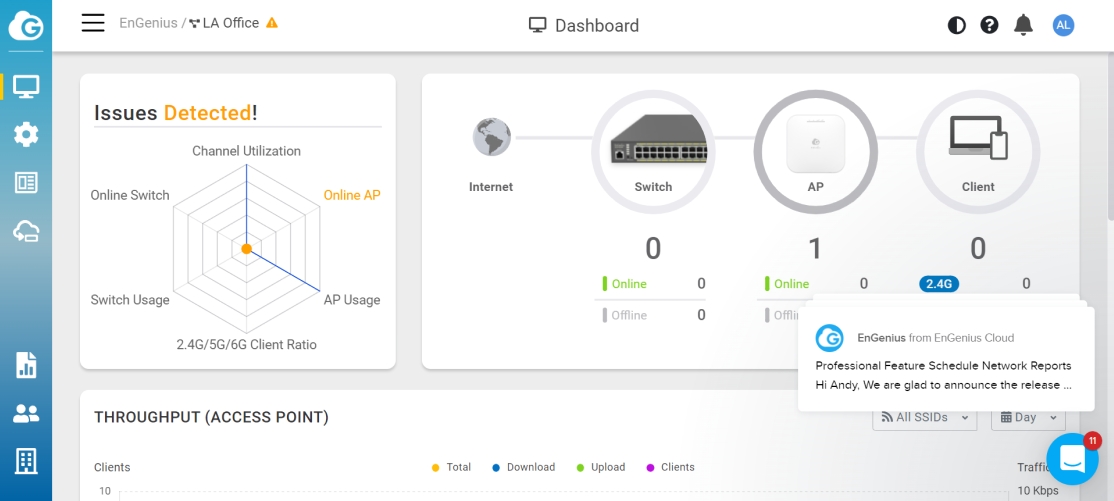
Once the device is powered on and ready to connect to the Internet, the LED indicator will stay Solid On, which means the device is now connected to the EnGenius Cloud Platform. It will automatically download the default configuration settings from EnGenius Cloud for automated provisioning.
When the Access Point is connected to the EnGenius Cloud Platform for the first time, it will automatically check the latest firmware version available. If the firmware upgrade is required, it might take 8~10 minutes to complete the process. The LED indicator will be Flashing (0.5 sec) till the process is finished.
Log in to the platform to configure detailed settings. For more information, please refer to .
If your AP cannot be managed by the EnGenius Cloud Platform, there might be a problem with connecting to EnGenius Cloud.
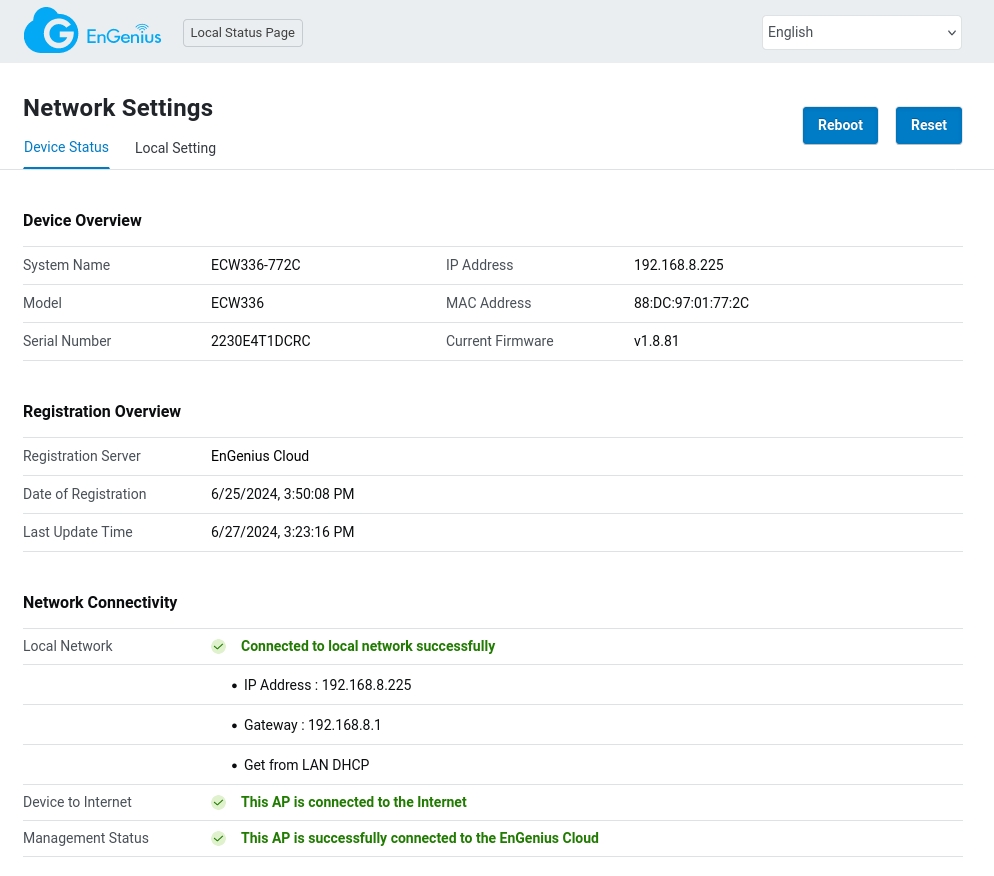
To troubleshoot the connection issue, you may log in to the Device Local Access page:
Use your client device (e.g., a laptop, mobile device, or tablet) to find the SSID: "EnMGMTxxxx" (xxxx is the last four digits of MAC - MAC would be found on the back of the device) and connect to it.
Under your web browser, enter the URL: or http://192.168.1.1 to access the device's user interface.
You can review the device status after logging into the AP with the default admin account/password (admin/admin).
For more details, please refer to the "".
Wi-Fi 6 technology for high-performance Wi-Fi in high-density, multi-device environments.
Four spatial streams support up to 2,400 Mbps (5GHz) and 1,200 Mbps (2.4GHz).
2.5 GbE realizes greater throughput and supports 802.3at and 48V PoE input for flexible installation over 100 meters (328 feet).
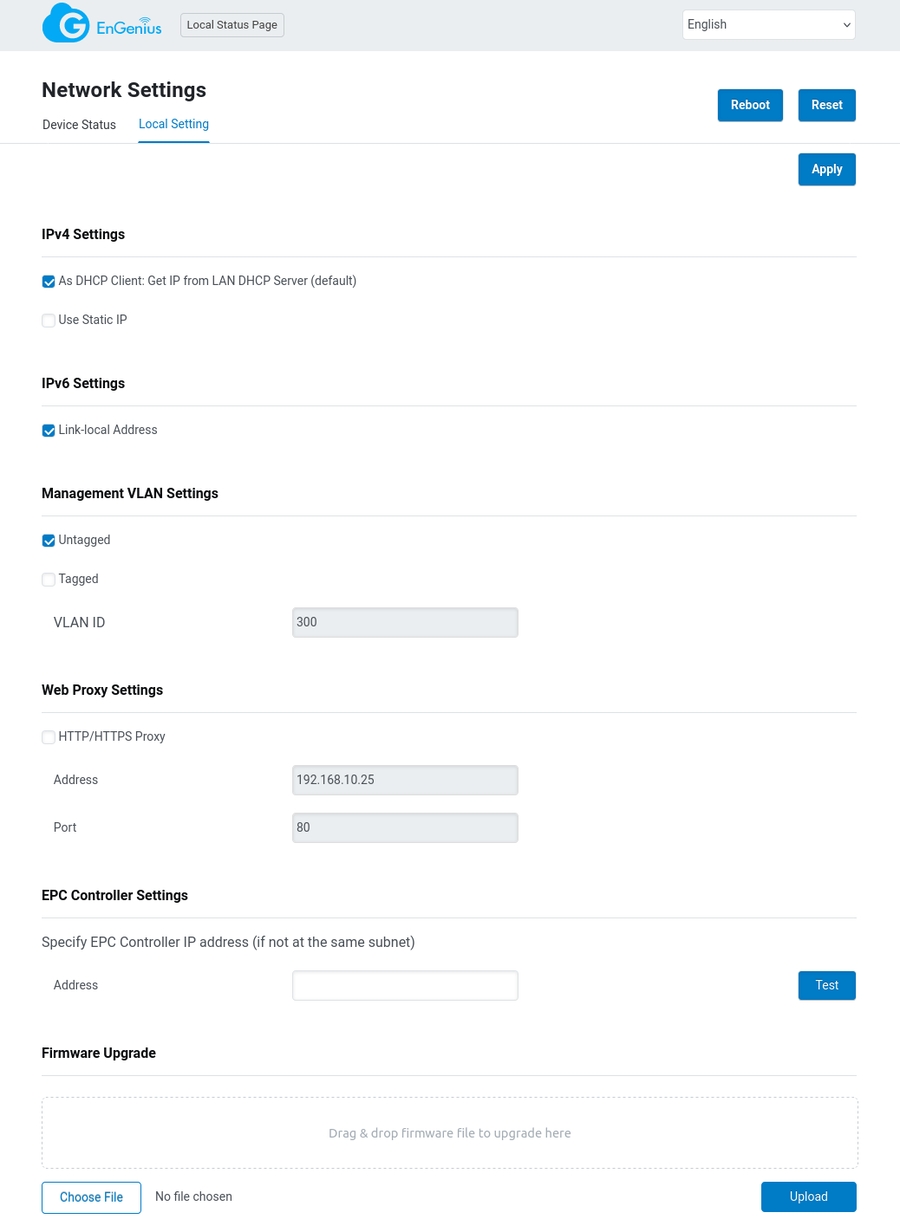
Check the information on Network Connectivity and take action if necessary.
Change IPv4 settings to "Use Static IP".
Configure the IP address, gateway, subnet mask, and proxy settings.
Reconnect this device to the LAN network and try again.

The EnGenius Product Security Team is tasked with researching, analyzing, and responding to security incident reports about EnGenius products. This team serves as the initial point of contact for all security incident reports and collaborates directly with EnGenius customers, security researchers, government agencies, consultants, industry security organizations, and other vendors to detect security issues with EnGenius products. Moreover, the team is responsible for issuing security advisories and communicating with external entities regarding measures to mitigate specific security issues encountered with EnGenius products. Please visit for more detailed information.
EnGenius refrains from disclosing details of a vulnerability that could be utilized to create an exploit. To report a security vulnerability, please contact [email protected]
Hereby, EnGenius Networks declare that this product is in compliance with:
Directive 2014/53/EU
Regulations 2017 (S.I. 2017/1206)/ Regulations 2016 (S.I. 2016/1091)/ Regulations 2016 (S.I. 2016/1101)
RoHS 2015/863
WEEE 2022
REACH Regulation
Maximum data rates are based on the IEEE standards. Actual throughput and range may vary depending on many factors including environmental conditions, the distance between devices, radio interference in the operating environment, and the mix of devices in the network.
Features and speci fications are subject to change without notice.
This device complies with Part 15 of the FCC Rules.
Operation is subject to the following two conditions: (1) this device may not cause harmful interference, and (2) this device must accept any interference received, including interference that may cause undesired operation.
Trademarks and registered trademarks are the property of their respective owners. For the United States of America: Copyright © 2023 EnGenius Technologies, Inc. All rights reserved.


This device complies with Part 15 of the FCC Rules. Operation is subject to the following two conditions: (1) This device may not cause harmful interference, and (2) this device must accept any interference received, including interference that may cause undesired operation.
This equipment has been tested and found to comply with the limits for a Class B digital device, pursuant to Part 15 of the FCC Rules. These limits are designed to provide reasonable protection against harmful interference in a residential installation. This equipment generates uses and can radiate radio frequency energy and, if not installed and used in accordance with the instructions, may cause harmful interference to radio communications. However, there is no guarantee that interference will not occur in a particular installation. If this equipment does cause harmful interference to radio or television reception, which can be determined by turning the equipment off and on, the user is encouraged to try to correct the interference by one of the following measures:
Reorient or relocate the receiving antenna.
Increase the separation between the equipment and receiver.
Connect the equipment into an outlet on a circuit different from that to which the receiver is connected.
Consult the dealer or an experienced radio/TV technician for help.
Any changes or modifications not expressly approved by the party responsible for compliance could void the user's authority to operate this equipment.
This transmitter must not be co-located or operating in conjunction with any other antenna or transmitter.
Operations in the 5.15-5.25GHz band are restricted to indoor usage only.
(If device is outdoor AP, please delete it. If device is indoor AP, need to add it.)
This device meets all the other requirements specified in Part 15E, Section 15.407 of the FCC Rules.
For mobile device usage (>20cm/low power)
This equipment complies with FCC radiation exposure limits set forth for an uncontrolled environment. This equipment should be installed and operated with a minimum distance of 20cm between the radiator & your body.
The device complies with Directive 2014/53/EU issued by the Commission of the European Community.
Standards:
ETSI EN 300 328 V2.2.2 (2019-07)
ETSI EN 301 893 V2.1.1 (2017-05) Final Draft
ETSI EN 303 687 V0.0.20 (2022-03)
EN 55032:2015+A1:2020 EN 55035:2017/A11:2020 ETSI
EN 301489-1 V2.2.3 (2019-11)
ETSI EN 301 489-17 V3.2.4 (2020-09)
EN 62368-1:2014+A11: 2017
EN 62311: 2020
The device is in conformity with the relevant legislation of United Kingdom: 2017 (S.I. 2017/1206)/ Regulations 2016 (S.I. 2016/1091)/ Regulations 2016 (S.I. 2016/1101).
Standards:
EN 300 328 V2.2.2 (2019-07)
EN 301 893 V2.1.1 (2017-05) Final Draft
EN 303 687 V0.0.20 (2022-03)
EN 55032:2015+A1:2020
EN 55035:2017/A11:2020
EN 301489-1 V2.2.3 (2019-11)
EN 301 489-17 V3.2.4 (2020-09)
EN 62368-1:2014+A11: 2017
EN 62311: 2020
IR 2030
This device complies with ISED’s license-exempt RSS. Operation is subject to the following two conditions: (1) This device may not cause harmful interference, and (2) this device must accept any interference received, including interference that may cause undesired operation.
(i) the device for operation in the band 5150-5250 MHz is only for indoor use to reduce the potential for harmful interference to co-channel mobile satellite systems;
(iv) where applicable, antenna type(s), antenna models(s), and worst-case tilt angle(s) necessary to remain compliant with the e.i.r.p. elevation mask requirement set forth in section 6.2.2.3 shall be clearly indicated.
Dubai, UAE
Local: (+971) 4 339 1227
Singapore
Local: (+65) 6227 1088
Taiwan, R.O.C
Los Angeles, USA
Canada
Netherlands