


EOC600 Outdoor CPE
Outdoor 5GHz 2x2 CPE with 16dBi Patch Antenna (EOC600)
Introduction
This Quick Start Guide is designed to guide you through installing the Broadband Outdoor CPE, model EOC600, including hardware mounting and configuration.
Broadband Outdoor CPE
Package Contents


System Requirements
To access SkyConnect, use a supported web browser or download the SkyPoint mobile app. Make sure to install the correct app and use a compatible browser before signing up for the SkyConnect Service or managing your network on the SkyConnect Platform.
Mobile App:
SkyConnect (iOS/ Android supported)
⬇️ Download the SkyConnect mobile app here

Web Browser:
Google Chrome (57.0.2987.110 and later)
Microsoft Edge (80.0.361.103 and later)
Mozilla Firefox (52.0 and later)
Hardware Overview
EOC600

Hardware Mounting
The access point can be mounted on the Wall and Pole, and please perform the steps for the appropriate installation:
Wall Mount
Determine where the Access Point is to be placed and mark the location on the surface for the four mounting holes. Use the appropriate drill bit to drill four 8.1mm diagrams and 26mm-deep holes in the markings of the Screw Position Identifier.
Screw the Anchors onto the holes until they are flush with the wall, and then fasten the Mounting Screws into the Anchors.

Hang the Access Point against the wall on the Mounting Screw Heads.

Pole Mount
Thread the open end of the Pole Mounting Strap through the two tabs on the Mounting Bracket of the Access Point.

2. Lock and tighten the Pole Mounting Strap to secure the Mounting Bracket onto the pole.

Configuration using SkyPoint and SkyConnect
Step 1: Power On Device
EnGenius Outdoor CPE devices can be powered the following:
EnGenius PoE adapter (EPA5006GR)
Powering with a PoE Adapter
(A) Connect one end of the Ethernet cable into the LAN (PoE) port of EnGenius Station AP and the other end to the PoE port on the PoE Adapter.
(B) Connect the power cord with the PoE Adapter and plug the other end into an electrical outlet.
(C) Connect the second Ethernet cable into the LAN port of the PoE Adapter and the other end to the Ethernet port on the computer.

Step 2: Connect to Device
Device registration can be completed using the SkyConnect mobile app or the SkyPoint network management system (NMS).
SkyConnect Mobile App
Scan the QR Code: Use your smartphone's camera to scan the QR code. This action will navigate you to the SkyConnect app download page.

Download and Install: Once the link opens, follow the on-screen instructions to download and install the SkyConnect App on your device.

Start Using the SkyConnect App
To begin using SkyConnect:
1. Locate the SkyConnect icon on your device's home screen or in the app drawer.
2. Tap the icon to launch SkyConnect.
3. Upon opening, SkyConnect will ask for certain permissions to function optimally.
- Allow SkyConnect to access this device's location: this permissions required for generic functioning of the app.

- Allow SkyConnect to access photos and media on your device: this permissions required for config backups and firmware upgrade.

4. After successfully installing the app on your smart device, launch the app. In the SkyConnect app, navigate to the home screen and select ‘Change Network’.

5. The EOC devices will broadcast a 2.4GHz management SSID. The SSID format will be ENMGMT<last 6 digits of the 2.4GHz radio MAC address>. For example, it might look like “ENMGMT408E7D”.

6. The default password for management SSID is “12345678.” Select the network name that matches your device's format from the list of available networks and connects to it.

7. If you see a pop-up window on your mobile device, please click on "Connect only this time".

8. Once connected, tap on the device image to start configuring and managing the EOC devices.


Step 3: Manage with NMS, SkyPoint
Log in to the SkyPoint network monitoring platform using localhost: (or local IP address) and port number 8980. The default credentials are admin/admin.

1. After logging in to the SkyPoint page, click 'Settings,' then click 'SNMP Config'.

2. On the SNMP Config page, click 'Create' to configure SNMP. Then, select SNMP Version and enter the Begin IP Address, End IP Address, Read Community, and Write Community. Finally, click on 'Create' to complete the configuration. *The default Read Community and Write Community on EOC devices are public/private.

3. After configuring SNMP, click on 'Discovery,' enter an IP Address or the IP Range, then click 'Start' to discover the device. Afterward, click 'OK' in the popup window.

4. Once the device is discovered, the next steps are to select 'Provision,' choose the device, click 'Apply' to provision the device, and then click 'Provision' to confirm your intention to provision these devices.

5. Click 'Yes' in the popup window to confirm the provisioning of the device.

6. Then click 'OK' in the popup window.

7. After completing the device provisioning, return to the Dashboard. Now, you can start monitoring and managing the EOC devices.

Network Connectivity: Action and Troubleshooting Guide
Accessing the Device
To begin troubleshooting your network connectivity, follow these steps to access your device's user interface:
Via Web Browser:
Navigate to http://192.168.1.1 on your web browser.
Log in using the default admin account credentials: Username:
adminPassword:admin.
Via Wi-Fi:
Locate the SSID named EnMGMTxxxx on your client device (laptop, mobile device, tablet). Note:
xxxxrepresents the last four digits of the MAC address, which can be found on the back of your device.Connect to this SSID to access your device’s settings.
Troubleshooting Connection Issues
If your Access Point (AP) is not managed by the NMS, SkyPoint platform, this indicates a possible issue with NMS connectivity. Follow the steps below to troubleshoot:
Device Local Access Page:
Access the Device Local Access page as detailed above.
Check Network Statistics:
Navigate to the Statistics page to review both wired and wireless interface states on the device's user interface. This information is crucial for diagnosing and resolving connection problems.
Take Necessary Action:
Based on the statistics and device status, take the appropriate corrective action to resolve any connectivity issues.

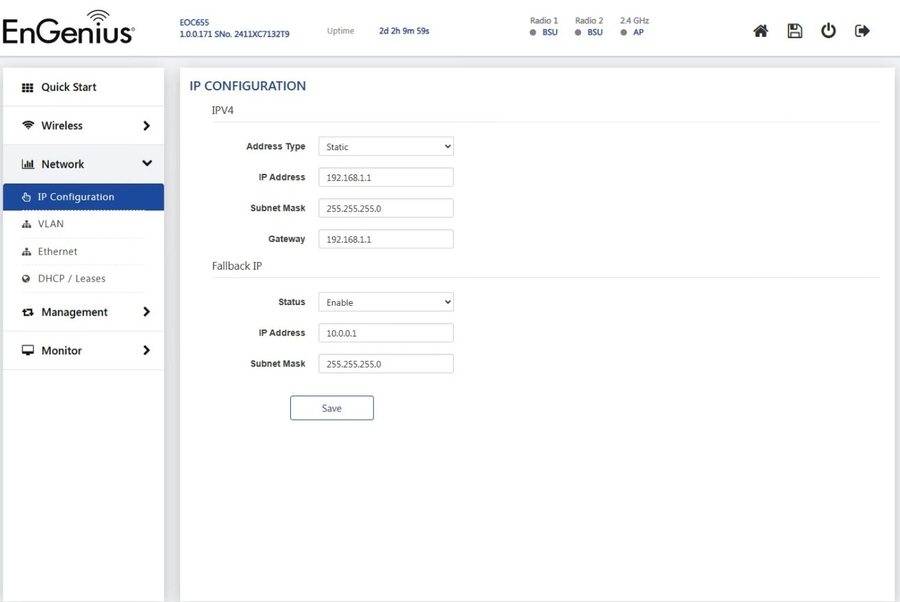
Change IP Assignment Settings
By default, the IP address of the Broadband Access Point (EOC series) is set to static IP. If you encounter issues with IP address assignment, please double-check the IP setting, including IP address, subnet mask, and gateway. If the issue still exists, you may change your IP assignment from "Static mode" to "Dynamic" via the following procedure.
Go to the Network -> IP Configuration section.
Change IPv4 Address Type to "Dynamic".
Configure the IP address, gateway, subnet mask, and proxy settings.
Press "Save", then click on the disk icon in the upper right corner, and then click "Apply."
Reconnect this device to the LAN network and try again.
For more details, please refer to the "User Manual - EOC series".
Last updated